Thursday, 25 August 2016

New Year card with Sheena Douglass

Hello lovely crafters!

Are you as excited as me and ready for a long weekend of Sheena shows? As you may know the Teamies have been posting inspirational projects for the last month and today is my turn. The idea is to show you how you can mix up the collections and how they work together.

I decided to create a New Year card. This would be perfect for friends or family you know who may not be religious but to whom you would like to send your very best wishes for the year to come.
And the thing is we aren't even using Christmas stamps to do this.. I admit it, I hold my hands up I am totally in love with the music stamps, guilty as charged lol... but you can get so many amazing effects with them. These are the stamp collections I have combined to create this card.


And so it begins... are you ready?... you may want to make a cuppa...lol
So I cut up a kitchen sponge and pulled out bits of it randomly to make it more natural and took a 7" square piece of card. I would suggest wearing gloves if you don't want to look like a Smurf...


I used Landscape Aquatints, the two blues and the green and then the purple (58) from the Beautiful Grunge collection and sponged them on to the background. Remember to leave some white patches so you get full colour and where the colours overlap it blends. 


Then you end up with something like this. I again used a technique also used on  my other post 'Techniques used for Sheena,' where you add silver Aquatints too.  A little tip for this is to add some water to your glass matt and then a drop of the metallic to it. This waters it down so that you get a hint of sparkle rather than full on gold or silver. Also the extra effect of this, is that the water you have soaked up also pulls some of the colour out of the background, so you get a lovely pattern with lighter areas too. I only did this around the edge as I wanted it to seem like smoke drifting away in the air. 


A close up so you can see the effect better...


I then took the music stamps and began to randomly stamp the rays and stars. They were stamped with Memento silver and gold ink. This gives you a base to work with. 


And then came the foils!! You saw it coming didn't you? lol And the fab thing is I managed to get hold of some coloured foils for half price on Hobby craft!! Yay! I love it when a plan comes together. :) You can see how I was planning to layer it up on the background...


For this I drew out an 8" square on a piece of card so I had a guide line to tear along. Always tear towards you and then you get the rough edge on the top.


The Hands of Time stamp then came into play and I stamped it round the edge. Distress Inks, Tea Dye and Walnut Stain were used to age it. 


The clocks were stamped several times as I was going to decoupage them.


I began to add colour with AquaBlend pencils


I decoupaged the torn edges and clock faces and added gold foil highlights to the centre of them.


I then mounted the time flies background on to an 8" card (which I had covered with black card as it was cream) and layered the fireworks on top of it. I wanted this card to represent the moment when we great the new year and all the fireworks explode.  And I thought the Time flies fit with this really well too as, like most of us, I don't know where most of the year has gone already! I had to photograph this at an angle so you could see the way the foil catches the light. I've also just realized... you know how some people trim their houses up for Christmas and they look like they can be seen from space?..This is probably the equivalent in a card...lol... No one will miss this if you send it to them! I added the same foil colours randomly around the edge to finish off this panel.  


The sentiment is taken from Sheena's Christmas Notes stamp set. I thought the freehand style of the font was perfect for this as it reminded me of how you can write words in the sky with a sparkler. :)


I hope you have enjoying seeing this project as much as I did creating it.  Why not have a try? It's great fun and whoever you give it too will be amazed and wonder how you made it. :)  And you can say oh I can't possibly give away my crafty secrets! ;) 

My fellow teamie, the lovely Penny Butler, will be blogging on Monday 29th August with her inspirational project.. you can check out her blog here... :)


Adele
x


Wednesday, 24 August 2016

Sheena Perfect Partners Christmas Launch

Hello everyone,

What an exciting weekend it is going to be as Sheena launches her new Christmas collection, Scenic Winter. Are you ready peeps? It has been an absolute honour and privilege to work with these stunning dies and stamps.  This is Hochanda's Weekend WOW... and you will be able to wow your nearest and dearest with cards made from these!  You won't want to miss the shows!  All the Teamies have made such wonderful things and Sheena will be sharing with you her hints, tips and demonstrations.

Friday  26th August 10am, 1pm and 5pm
Saturday 27th     1pm and 5pm
Sunday 28th        11am and 3pm

I love this delightful, cheery little robin and thought he went really well with the church stamp (called Believe) from an older collection. I've used a 3D snow technique I developed awhile ago. I will do a tutorial on how to create this effect after the shows. :) And these dies lend themselves perfectly to diorama cards.


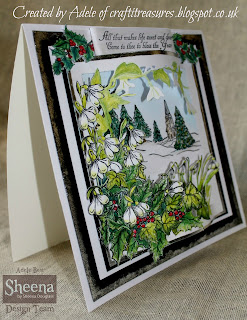
I love snowdrops. I am waiting for mine to come up this year, so looking forward to it, they are so pretty. This was created by decoupaging the flowers and holly as well as shaping the frame outwards like a bay window to add depth.The small holly flourishes either side of the sentiment came from the Victorian Christmas stamps collection.


Ahhh, sigh, the Northern Lights... I dream of seeing them one day... but until then... I shall make my own! These dies are fabulous for creating those festive scenes. I wanted to show that you could take the same imagery and use it in a completely different way. This is the same landscape used in the snowdrop card above, except with dies which I stamped and then layered on to the Aurora Borealis sky which was created with Aquatints. Further texture was added with the snow technique I use. They are so versatile. 


I adore this stag die frame, fell in love with it as soon as I saw it, I love these majestic animals. For this card I was inspired by a visit to Sweden where I saw forests of silver birch trees (one of my favourites ). Silver foil was added to highlight the trees and stag and again I used the 3D snow method on the background.


This collection works perfectly with the recently launched Victorian Christmas stamps. It's as if it was all planned isn't it?  Sheena is very clever like that. :) I decoupaged the roses to add depth.


And finally, I made this little card, to show how you can also design a quick but effective little card with the new range. 


On these cards I have used Aquablend pencils, clear and silver sparkle pens as the colouring mediums. 

I shall be back tomorrow as it is my turn for the Teamie inspirational post. :) 

Adele
x


Tuesday, 23 August 2016

Sheena's Floral Perfect Partners on Hochanda.

Hello lovely peeps!

I hope you are all well! I'm super excited to tell you that Sheena is back with us on Hochanda, Thursday 25th August, with her Floral Perfect Partners collection.  I adore these, they are blooming lovely! ;) The shows times are....10am, 3pm and 6pm.

And if that wasn't amazing enough she is with us all weekend too for the weekend WOW... WOW would be an understatement really...just wait until you see the new Christmas dies and stamps she has for you, they are stunning and beautiful. I will blog about them tomorrow...

So back to the flowers...these are the samples I have made for the show. The wonderful thing is now, because we have the foils we can also use them with the flowers to add highlights and shimmer.


I so love these stamps and dies, so pretty! I always enjoy creating with these. You will see the Lilies, Anemones and the Pansies and much more! 


Below is the canvas I made for the DT call out so you can see what the Pansies are like.


Wonderful things coming up this weekend from all the Teamies, so watch this space and Hochanda if you can!  Back soon folks...I will also be blogging about how I made these floral cards after the show. 

Adele
x


Wednesday, 17 August 2016

Techniques used for Sheena.

Hello everyone,

This is a post I have been meaning to share since I created the cards for Sheena using the A Little Bit Festive stamp collection. I had a light bulb moment...*ping* after the show... it does happen sometimes, so let's make the most of it...lol.. I thought it would be a good idea to share with you the techniques I used on these cards (in the last post) and then you too can try them out if you like. They are really fun and it's great to play. Every time I make something, I like to push myself and try a new technique and experiment, and then I make new discoveries along the way.

As it happens I did not take step by step photos of the ones created for Sheena and Hochanda as the brain wave came after the event... so I have created a new project using all the same techniques, used across all my samples, in one card... are you ready?  lol.. here goes! 

First I started by taking a piece of Sheena stamping card and marked out a 7" square on it. This gave me a guide to tear a rough edge along. Always tear toward you and then you get the texture on the top of the card or paper.


Then I ended up with this, my base to work with. This is same method I used on the background of the Silver Bells card.


Next I took the Aquatints, the Landscape set, using colours blue (08), dark blue (03) and green (22)
and began to sponge them on to the card, leaving white patches for some of colour to take completely and then it would blend where it overlapped.  I did this in the order shown above and this is the technique that was used on the Noel card. 


So I ended up with this. I love the effects you can get with Aquatints, they can be really dramatic. 


Then I turned to the Mixiton Relief from Pebeo. Oooh, so love this too! 


It was applied along the rough edge I created and then I pressed it down with my index finger. A little tip... if you do this and then do the same on the second side of the card, you can go back to the first application a few seconds later and press your finger into it again. Because it has already started to set to can get a deeper impression of your finger and it gives you more texture. I also think it gives you a great effect being on the torn card in the first place as it makes it really distressed.


When it has gone clear you can add the foil to the edge.


Then Sheena's Grunge Band stamps came into play. I do love these, excellent for creating so many effects. I used these on the dove peace card, the Wishing you a Merry Christmas scroll card and the Noel card. I randomly stamped them with Memento Gold Galaxy ink. This gave me a guide to work from for the foil. 


After it had dried I applied the gold foil which turned the circles into rays of light. I also applied the liquid paste to the stars so I could foil those too. 


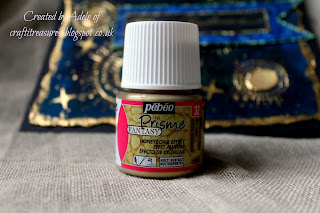
Then to mix it up a bit, I felt like adding a extra technique. I thought these Prisme paints were fantastic when I saw Sheena's and Donna's samples on the mixed media shows. As long as you make a deep enough reservoir with the relief paste and don't put too much of the Prisme inside it, it will be fine. It does take quite a while to properly dry though but worth it. 


Then I decided to create a sentiment banner using the lighter blue from the Landscape Aquatints and the sponging method again. On this I also added the gold Aquatint from the Essentials collection. A little tip for this is to add some water to your glass matt and then a drop of the metallic to it. This waters it down, so that you get a hint of sparkle rather than full on gold or silver. Also the extra effect of this, is that the water you have soaked up also pulls some of the colour out of the background, so you get a lovely pattern with lighter areas too. :) 


This is the finished card. The sentiment is from Sheena's new Victorian A Little bit Festive collection, Christmas Notes. I thought it fitted in well with the design of this card. Gold Stickles were added to the edge of the sentiment. 


I wanted you to see that you don't just have to use "Christmas" stamps and images to get a nice seasonal card, You can also create something contemporary using Sheena's other stamps. :) So don't be afraid to experiment and have a play! 


Before I finish this post I will add the photos I did take whilst making the Silver Bells card. I have photos of the background! Two at least.. lol. This was created with the blue Aquatints. I then dropped water on it with the pipette and added splashes of the Silver Aquatints, followed by the snowflake stamp from the set and heat embossed them with white puff powder. 


I hope you have enjoyed these techniques. I will be back next week with a new inspirational project from Sheena's range, following on from my fellow Teamies creations, so watch this space! :)

Adele
x


Thursday, 4 August 2016

Sheena is back on Hochanda.

Hello crafty peeps!

What an unbelievable few weeks it has been. I think I have finally got used to the amazing news that I am now a Sheena Teamie! I've made my first cards as an official inkoid! It's very exciting, I always find card making a magical process but when you are creating something for Sheena it takes on a special kind of wonder and thrill all of its own.

So, Sheena is back on our screens tomorrow (Friday 5th August) at 10am. 1pm and 6pm... only one more sleep! And if that isn't wonderful enough she is also doing Pebeo mixed media shows too at 11am. 2pm and 5pm. So she will be busy, busy, busy... We may as well rename it Sheena Day! lol

I've had SOooooo much fun playing with this fabulous collection of stamps, A Little Bit Festive. They are from last year but as with all things Sheena, they are timeless.  Now there is added encouragement for using this range as they also work incredibly well with the Pebeo foils.  These are my new love! How did I ever manage without them?  Once you try them, there is no going back and you won't want to anyway! They just beautifully enhance everything.  If you want to create a showstopping card your family and friends will still be talking about long after Christmas, foils are the way to go, and as I always say bling is not just for the festive season.

I wanted something atmospheric for this Noel stamp, so I used Aquatints..sigh.. how I love them too. What also worked really well for this was the Grunge Band stamps to add a halo around the star and to give the impression of a burning light. So don't be a afraid to mix up your sets, you may come up with a new and exciting idea.  That's is the true beauty of Sheena's collections, they work together perfectly.


This card mixes up a few of the stamps from the set, so you can see how well they combine, along with the added holly and poinsettia dies. Again, the Grunge Band stamps were an excellent addition to this design, creating a glow around the candles. You can't really tell from the photos but the candles are decoupaged, I do love a bit of that too. :) 


Ah, "Silver Bells....Silver Bells...it's Christmas time...in the city."  I had the Doris Day song in my head all the time I was designing this card and by the end of it I was feeling very Christmassy. As you can see I carefully stamped the Silver Bells sentiment separate too as I wanted it to remind people of the famous song. (Can you hear Doris?) I decoupaged the bells to create depth and interest and I decided to make a background that would be reminiscent of snow gently falling, whilst festive shopping. 


For this card I thought I would create a graduated background and purple just spoke to me, next to blue and green, it's my other favourite colour. A scroll was made for the Peace wording and it was coloured with Aquablend pencils (also graduated.)  The Grunge band stamps (I might be obsessed with these now lol) also worked well for the Heavenly dove too, especially with added silver foil. The Dove was stamped and cut out so it could be layered.


So.. I've had a wonderful time playing with these, and all the Teamies have made some stunning creations, wait till you see them on the telly!  I can promise you, that there will be many more amazing things coming up in the future! So watch this space, you won't be disappointed! 

Adele
x