Tuesday 31 May 2016

Steampunk card with Sheena Douglass stamps

Hello everyone.

I hope you are all well.

Today, I thought I would share with you a birthday card  made recently for a friend. This Sheena stamp has so many possibilities, this lady comes from her Day of the Dead collection. It was then combined with a Graphic 45 sentiment stamp, which I felt was very apt for the design and a set of Kanban Steampunk stamps.


I started by creating a card blank with some lilac pearlized card. A panel of black card was stamped with a flourish and then embossed with silver powder, this was so I had a rich Gothic background paper. The purple paisley paper is from Graphic 45's  Rare Oddities pad. The edge of this was embossed with black powder.

The lady was stamped twice so I could cut her hair out separately and layer it up to give depth. For this design it was better than a flatter image as it would compliment the layering of the hat and the wings. She was coloured with Crafter's Companion AquaBlend pencils. The Steampunk wings were stamped on to a graphite, pearlized, sparkly card and embossed with black powder. Sections of them were then coloured lighter with a silver pen and I glittered over the top of these with a clear Spectrum Noir sparkle pen. I created straps across her shoulders so it looked as if she was wearing the wings rather than them being randomly just stuck on.

The Sentiment was stamped and cut out freehand and then the edges were shaded with Tea Dye Distress Ink. She couldn't not have a small top hat to finish off her look, so this was stamped, cut and coloured. I added small flower dies as decoration.

The most visible wing had foam tape placed underneath to add depth, I then layered her over the top with more foam. 

This will not be the last time I use this stamp. I still have lots of ideas. :)

Adele
x


Monday 23 May 2016

Amongst the Stars with Docrafts and Spellbinders.

Hello everyone,

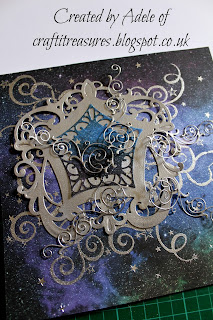
How I love to gaze at the stars, how beautiful they are and with that in mind I thought I would create this card. It would be a perfect to give to someone destined for great things. :)

 And bling is not just for Christmas, it's pretty all year round too. :)

I purchased these Docrafts Inspirational sentiment stamps a while ago and especially love this quote.There have been a few ideas floating around in my head of how to use this since I got it and this is one of them, (more to come.)

My mum hasn't crafted for a long time, which is a shame but she kindly donated two boxes of stamps (she has barely or never used) to my craft stash. (At least she knows where they are if she wants to make something in the future, they have a good home.)  In one of the boxes was a set of swirls and stars stamps, that turned out to be just the thing I needed for this project! Serendipity! :)

Finally, I've used a piece of Kanban card that's been in my collection for a few years (everything comes in eventually but if you are anything like me you will have a paper obsession, you have a huge pile that you sometimes don't want to use because it's too nice, or you are waiting for a particular crafty plan to use it. I can admit though I am getting better at this and now I even tear paper sometimes! Shock, horror, sometimes, it's actually fun ;) ) The galaxy print is lovely and I'm glad it wasn't used until now, (there was a method in my madness on this occasion) it seems it was meant for this creation. 

An 8"x 8" card was used, a 6"x 6" would have limited the design and prevented seeing much of the beautiful sky and that would be a shame and a waste. The swirls and stars were stamped on to the galaxy background and then embossed with Wow Silver glitter powder. The idea was for these to look like a tail, or streams of light behind the shooting star.

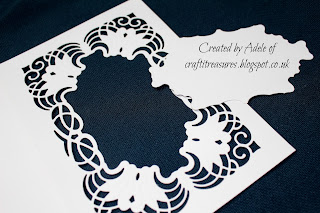
I took the Spellbinder die, cut out the large ornate star frame with white card and coloured it with Superfine silver embossing powder from Papermania (Docrafts.) The smaller inner star frame was cut out in the universe card, I had enough left after trimming the excess from the 8" card blank. These frames were then attached to the background. 

Docrafts also provided the small die cut stars as well as a craft punch. This gave me a variety of shapes and sizes. I glittered embossed the largest stars, the ones that resembled the Bethlehem star we see on Christmas Cards and the wooden star buttons, the others were embossed with plain silver. 

Again, I turned to my die-namics flourish to add some swirls. Seven pieces were cut out, two were wrapped in opposing directions directly around the sentiment, carefully, the other five were arranged underneath and around the stamped panel, so the curls from these would overlap and bring the design together.

This lovely sentiment was stamped on to a blue background, created with Colour Cloud and silver embossed. The wording was then cut out with another Spellbinder's die. Silver Stickles was used around the edge to bring it forward and highlight it, making sure that the twirls stood away from the glue until it dried. 

I scattered the stars around the card, the biggest ones with foam tape underneath to add depth and texture, the others were glued flat. Deliberately, the wooden stars were kept to surround the inspirational quote as they were larger and thicker and would draw the eye towards the words. These are also the only stars gems were added too for the same reason. 

For the finishing touches, Star Dust Stickles was applied to the edge of the galaxy die cut star and randomly to the background so it would have a colourful shimmer. 


I've really enjoyed making this card and also discovered I would like more star dies (or need ;) ) Then I could boldly go places I have not been before.....

Dies used:

Spellbinders Label 48 Decorative Labels
Spellbinders (Just rite) Nested Medallion labels
X-Cut mini stars

Stamps: Docrafts Creativity Essentials Inspirational stamp sentiments. 

Adele
x


Saturday 21 May 2016

Voyage Beneath the Sea with Graphic 45 stamps

Hello lovely peeps, 

I hope you are all well. :)

It seemed like it was time for a trip, so the other day, I took a voyage to the bottom of the sea with Graphic 45 stamps.  Here, I have used set one (mermaid and sentiments) and set two (man riding fish.) 

An 8” x 8” Card was chosen to allow me more room to work with and decorate. It began with creating a shimmering background with mica spray inks, followed by two panels, one square (coloured blue/green) and another rectangular (more blue) with an embossed white puff edge. Then they were sprinkled with blue, green, white and silver embossing powder.
   

Crafty tip:  Personally, I never pre-cut the background paper to fit the card base, it is always a safeguard in case it slips whilst applying it to the card blank, then you get full coverage. I may use glue or red doubled sided tape (much stronger than the white) but I line up the bottom left corners and once this is in the correct position, I stick the corner down and run my left index finger up along the side of the card as I gradually stick my panel to the base, this way I know it's straight. Then I turn it over and after I have made sure all the edges are properly stuck down I trim the excess with a ruler and craft knife.

Several of my foliage dies were perfect for this project and would easily make the coral reef plants. These were actually Tonic Regal Fern, a pine branch, a Die’sire small pine branch (from Crafter’s Companion), Die’sire small Mistletoe die, a Die-namics Formal Flourish, (I use this one a lot, it’s very handy), Creative Expressions Splendid Swirls and the vine base from the Spellbinder’s ivy die.

 As you can see I coloured these in different shades, I also used copper and green embossing powder on the larger pine branches, to add more texture and richness.

The sea anemones were created by using Spellbinder's and Lea’bilites flower dies, these were layered together to give them depth and fullness, as I wanted them to appear as if they had lots of arms which would sway about in the water. They were coloured with alcohol pens. The largest was made with an icicle die from Die’sire. A thin strip of card was coloured and quilled and then I wrapped the icicles round this, folding the tentacles back, opening them out and adding gold Stickles to the centre.

 I began to position things, I had a basic layout in my head but it’s always good to play about before you stick things down, layers would be built to create a busy reef.  A wooden strip of waves, which has been in my stash for a while, was excellent for this project, it would complement the white around the mermaid panel.  It was painted with Docrafts paint (a mixed shade to match the spray inks) and then embossed with white puff embossing powder (from WOW.)  Glitter was later added to the blue sections with Star Dust Stickles, I also thought it would be good to represent the ocean currents.

 The mermaid, seahorse (a kaisercraft stamp and die) and gentleman with fish were stamped with black Stazon ink and coloured with AquaBlend pencils from Crafter’s Companion. Shimmer was added to the fish, seahorse and mermaid’s tail with a Spectrum Noir Sparkle pen (clear.) Cogs were included, in keeping with the Steampunk theme, in various sizes and hues. Sequins, pearls, and gems were scattered throughout the reef to make it glint here and there as well as drops of Glossy Accents and White Liquid Pearls to create texture.

 The mermaid was glued to her background panel, leaving the tail and head free to stand away from the card, so it would seem like she was swimming along. The fish was fixed in the centre, leaving its head to come forward out of the picture. I then applied Peacock Stickles around the edge of the square and Star Dust around the rectangular panel.

This is the finished card as a whole, it took a long time to make but I enjoyed every minute. I'm sure I will be undertaking many more voyages to the bottom of the ocean in the future. :) 


Here is a recap/ further information for you about what I used for this project. 

 Stamps:  Graphic 45 Voyage beneath the Sea set 1 and 2.

Colour Cloud Inks: Summer Sky, Ocean Blue and Basil Leaf

Embossing powders:
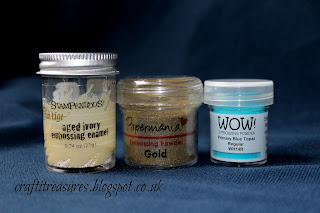
From Wow: Metallic Copper Super Fine, White Puff Powder, Metallic Silver Sparkle, Primary Blue Topaz Regular, Clear Hologram Sparkle.

Other embossing powders:  
Blonde moments Ultra Thick Savoury Tropic and Papermania Superfine Silver.

Crafter’s Companion:  AquaBlend pencils and Spectrum Noir Sparkle pen (clear.)

Stickles: Peacock, Star Dust and Gold.

Crafty Notions Colour sprays: Kingfisherlicious, Bluebell, Luscious Green and Silver. 

Dies:
Tonic Regal Fern
Die-namics Formal Flourish
Spellbinder’s Ivy die
Kaisercraft Nautical dies and stamps.
Creative Expressions, Finishing Touches- Splendid Swirls
Large Pine die (apologies can’t remember do not have original packaging)

Crafter’s Companion dies:
Small pine branch from Die’sire Christmas Classic Robin die set
Die’sire small Mistletoe die
Die'sire icicle die.

Cog dies are Memory box (small) and Cheery Lynn (large.)

Also used:
Mixed blue sequins, 
blue and white pearls of various sizes, 
Papermania Glazed Iridescent Gems,
Glossy Accents
Foam Tape and glue
Docrafts Artiste Acrylic paint: Metallic Emerald Green, Metallic Sapphire and Pearl medium.

Adele
x


Wednesday 18 May 2016

Edwardian Ladies cards with Pion design papers.

Hello everyone,

Today I thought I would just share a quick post with you about vintage ladies cards.

For a few years now, I have had a love of  Victorian and Edwardian photographs, especially those of  Edwardian actresses, such as Lily Elsie and Maud Fealy.

They always look so graceful and elegant in their exquisite gowns. I have seen images of  Miss Lily Elsie used in crafting papers before and more recently, it seems that the Magnolia Lane Papers, (from ultimate crafts)  have been influenced by this photograph too, you only have to look at it to make the connection, I saw it instantly, being familiar with these pictures. Isn't wonderful that years later, these moments in time which captured the beauties of the age, are still being admired? Crafter's are now being inspired by these marvellous historic pictures. Obviously, Lily could never have imagined this, when she posed in her gorgeous dress and headpiece. It's worth looking up Lily Elsie and Maud Fealy, you will see some stunning photos of them. 


There are plans to do more projects with the Magnolia Lane papers but for now, I will share with you some cards I made with papers by Pion Design. These lovely 12"x 12"papers have several images of Edwardian ladies which are just perfect for creating vintage cards.


This  lady was combined with vintage postcard paper, a Spellbinder ivy die, lace with threaded ribbon and pearls. 

Kaisercraft papers were used for the above creation, dies flowers and embellishments. 

I love these background papers which came from Kanban, so pretty and classical. I've torn them in to segments and only used a portion of them, this gives an aged appearance. (Don't be afraid to tear papers). It also lets you use two different designs which complement each other, you can also use up any bits that some would call scrap (that wouldn't be a crafter though would it?), this makes your paper go further and if you can't decide between two use both.  There is no rule anywhere that says you have to use a complete sheet of paper for a background on a card. Go on, be brave, and rip some paper! It's actually quite fun! Various dies were used and the trellis is an edger die from Crafter's Companion. 

You can see more of my Vintage Ladies cards on my facebook and pinterest pages. There you will also find a card I made with a printed photograph (out of copyright)  of the beautiful Miss Fealy.


I hope I have inspired you to take a look at some old photographs and maybe make some vintage cards yourself.

Adele
x


Tuesday 17 May 2016

House Sparrow card tutorial with Sheena Douglass dies and stamps

Hello crafters,

I have little feathered lodgers, House Sparrows, they've been here since I moved in and they are very busy at the moment. They are sweet, funny creatures, always twittering, sometimes squabbling and occasionally waking me up at 6am. I'd prefer to be woken by bird song rather than "cheep, cheep, cheep" but I don't think they do requests.  ;) Someone once said to me I should block up the eaves but I could never do that, I could not deprive an animal of it's home, no being should be deprived of that.

I've had this project in my head since I saw these dies and stamps and I've finally got round to making it. You know what it's like being a crafter, so many ideas and not enough hours in the day!

So this card is a tribute to them, my comical little house guests.

For this project I have used Sheena Douglass stamps and dies from Crafter's Companion.

Products used:

Cottage on the corner stamp
Little Bird die
Birds of a feather stamp
Wild Rose die
Wild Rose Briar Stamp
Enjoy the Silence stamp
Crafter's Companion AquaBlend pencils
Memento Rich Cocoa
Colour Cloud inks, green and blue
White ink pad
Glossy Accents
Foam tape and glue
Small gold pearls

This was made on a 8x8" card. First I stamped the trees directly on to the left hand side of the card. I used Memento Rich Cocoa as I wanted a softer image, than I would get from stamping with black ink. I then stamped the cottage on a separate piece of white card and cut out above and round the cottage, (not underneath) leaving an horizon line. This was then coloured as grass, (with Colour Cloud ink) so it looks like the cottage is in a field. The house was coloured with Crafter's Companion AquaBlend pencils.

I cut out and stamped the bird and gave him the markings of a House Sparrow.  I then also cut out the roses and stamped them.  The wonderful thing about Sheena's stamps and dies is that they are designed to fit it each other, hence the Perfect Partners name.  With the Roses, each petal is an individual shape, so it makes it easier to line them up. All you have to do is ink the stamp up and then press your die cut down on to it.

Crafty tip:   If you find the correct direction for one of the die cuts on the stamp, do them all in one go and line them up like a production line, this makes it easier. 

Next came the leaves, after cutting them out and embossing them, I began to colour them with my AquaBlend pencils, and then added water to blend. 

The flowers were coloured in the same way. You don't have to worry if you slightly misalign the stamp on some of your rose petals and get a small white border you can always trim this to the edge of the stamp. 

I then added foam tape to the back of the cottage scene, only where the cottage was, not on the lower portion of grass as this was going to be glued flat to the base of the card. I just wanted the house to stand away from the back of the card.


So, I then ended up with this, a base to build upon with the flowers and the bird. :)

I started to arranged the roses, leaves and Sparrow on to the card, once I liked the layout I began to glue the pieces down in to place.  

I wanted the bird to appear as if he was right inside the rose briar, just having a moment, before he flew back to the house to roost. I added a drop of Glossy Accents to his eye to make it shine. His tale was glued flat but his body is stood away from the card, to give it depth, with foam tape underneath. 

After I curved and shaped the flowers, giving them a more realistic appearance, I placed a golden pearl in the centre of the flower stamens. 

The clouds were created by pressing my index finger into a white ink pad and then dabbing it on to the sky, the edges were softened with a cotton wool pad. 

This is the the finished card.

I hope you have enjoyed this tutorial. I've got lots more ideas coming up.  If only I could make the days longer (and house work did not interrupt them. ..)  

Adele
x


Monday 16 May 2016

Thank you cards for friends.

I am extremely lucky to have very lovely, caring, thoughtful and supportive friends.  Recently, a group of them surprised me on my birthday, by giving me a donation towards my craft stash.  I was so overwhelmed and touched that I decided to make them all thank you cards, with the items I was able to buy with my funds. I thought they all deserved something special for their kindness.


This card was made with lovely Crafter's Companion dies, (and others) the butterfly is from the Sara Davies Signature Collection and the Classical Edge is from the Downton Abbey dies (I absolutely love this range and hope to expand my collection of them in the future.) I cut out the Downton die in gold Centura Pearl and then backed it on to a paler pearlized yellow paper.  I coloured the butterfly and flowers with alcohol pens and then added glitter to them by using a Crafter's Companion Spectrum Noir glitter pen. I also embossed the die cut butterfly with gold powder. I have to say, I think this die is wonderful, it's the most realistic style of butterfly die I have seen and that's why I like it so much. The flourish die is Tonic Regal Fern and the flowers are from Spellbinders. 


The other Downton purchase I made was the Motor Vehicle as I thought it would be nice to have something to make men's cards with, (they can be hard to make things for sometimes, can't they) I received the Downton Elements 2 stamp set as a birthday present so they went perfectly together. I embossed the medal stamp with gold powder and layered the ribbon up, to give it more depth, by stamping it twice. I don't have any gilding wax yet, but hope to invest in the future as I've seen what it can do (and it would give a smoother finish.)  Lacking in this product, I had to improvise and pressed my finger in to a gold Memento pad and then rubbed it across the car die. I think the black with the gold is a wonderful look. I used a Papermania vintage postcard stamp, and added the embossed 'Thank you kindly' words from other stamp set. The lace trim is from Joanna Sheen


I created this card with the Elegant Border from the Downton Collection, again by Crafter's Companion.  The paper and topper was from Magnolia Lane by Ultimate Crafts. I thought the sentiments were lovely.  I glittered the flowers on the paper with a clear Spectrum Noir sparkle pen. The pink speckled paper at the bottom of the card was made by myself with metallic spray inks. Then I added die cut flowers and branches, coloured by alcohol pens.


Again, made with Magnolia Lane papers, I also added my own sprayed paper to this card and a lace trim die by Joanna Sheen. I coloured over the flowers on the paper and the butterfly with the clear sparkle pen, finishing it off  again, with die cut flowers and branches. 


I've been wanting a hot air balloon die for awhile and found this x-cut one for a bargain price!  So I thought, sold to the mad crafting lady! I am going to play about with this more in the future as it has so many possibilities. I also used Colour Cloud Inks and Memento inks to create this. 


I treated myself, with the kind donation, to some Joy nautical/seaside themed stamps. I loved this set with the Octopus and thought it would also be perfect to make cards for my Steampunk friends as their is always talk of watching out for krakens! As an experiment I decided to add hessian  and some real seashells.  I stamped and cut out the tentacles for the Octopus (kraken, for the Steampunks :) ) embossed them with copper powder and used Colour Cloud inks to create the sea.  I thought cutting them out rather than stamping straight on to the scene would add depth and texture. I added bubbles with glossy accents and white pearl effects drops. The edge was embossed with white puff powder, this gave the effect of sea foam and brought it forward out of the card, by adding contrast. The background paper was created by myself, again with spray inks. I then sprinkled, silver, white and turquoise blue embossing powder over the sea panel to add shimmer to the water. It was finished by adding twine and an anchor die, which I gave texture too by applying a mixture of copper, black and green embossing powders, this made it look aged and a bit rusty. I also love this sentiment. 

I hope you have enjoyed seeing these thank you cards. It's always nice to let people know how much you appreciate and think of them by making them a special card.

You can also see more of my cards and crafts on my facebook page


or on pinterest 


Adele
x


Saturday 14 May 2016

Summer in the country

Hello peeps,

You will be pleased to hear that I have not been googling colour wheels today (not opening that can of worms again, it only causes trouble doesn't it? lol)  and now there in a second subject that Sheila and I have decided we won't discuss anymore, colours (the list is growing.) ;)

Just a quick little post today. I  thought I would share this card with you, I made it awhile ago. I really enjoyed creating this with Memory box dies, a Cottage Cutz die and Distress Inks. I designed it as a layered frame, so the scene leads you into it. This is still one of my favourite projects. Sometimes you can achieve quite a bit only using dies.


Have a lovely day folks,  back soon with more projects.
T.T.F.N.

Adele
x

Thursday 12 May 2016

Iris card Tutorial

Hello lovely crafter's,

Remember I said I had an idea for a card the other day? Well here it is, and I thought why not show you what I did to achieve it step by step?

I knew when I had the idea for this card, it would not be an easy project but I like to challenge myself (either that or drive myself crazy ;) )  I wanted to see if I could make it.  I’ve never made a card like this before and it is always good to try something new when crafting. The beauty about this card is you do not have to use an ornate frame like I have done, you could just as easily use a plain oval, circle or rectangular die and still get a lovely card. (I may try that too myself in the future!) Imagine what the front could look like with some patterned card, embossed by a folder, with a shape cut out of the middle, it would look wonderful I think. 

For this projected I used:

Spellbinder's Cascading Grace die set
The Sheena Douglass A little bit Floral Iris stamp set
Jet Black Stazon Ink
Versa Mark Ink pad and pen
Embossing powders
Crafter's Companion Aquablend pencils
Distress Inks, Tea Dye and Walnut Stain. 
White card
Glue and foam tape. 
Ranger Glossy Accents, clear dimension medium. 

1.   I took a 5x7" card and placed the Spellbinders Cascading Grace die in the centre of the front panel. I have used this die many times before, although on this occasion, I was cutting into the card, rather than out of it. I taped it with low tack tape to keep it in place and ran it through the machine.

2.   Crafty tip.  If you have problems embossing part of the die because you are unable to twizzle it round on the cutting plate of your die machine, you can take a cotton bud and gentle rub it into the grooves of the embossed section. 

3.   I cut out the centre panel to create the frame.

4.   The tag was kept to use later.

5.   I selected my choice of embossing powders to create a shabby chic/speckled finish.

6.   I then also cut the frame into an A4 piece of white card. The card, being bigger, would allow me wiggle room to line up the ornate frame back to back.

7.   Once I had lined up the frame, wrong sides together, as you would do with sewing, (this took time,) I carefully glued each section to make sure it met at each point.  Then I cut the centre tag out and trimmed the excess card around the edge. Now it gave me a stronger card, as the front had been weakened by cutting the frame and it also gave it a cleaner professional look on the inside. It was now a double thickness card as it were. 

8.   So then I ended up with this.

9.   Now I moved on to decorating the inside of the card. I used Versa Mark ink to randomly stamp small vintage text, the tiny Iris from the Sheena Stamp and a swirl from another stamp set. Versa Mark allows you to create a watermark effect. Over the top of this, I used Tea Dye Distress Ink and Walnut Stain Distress Ink around the edges. It left the stamped images white on the background as Versa Mark resists the coloured ink. I then sprinkled embossing powders on the inside frame too, to match the outside.

10.   I stamped the Iris twice with Jet black Stazon (as I was using watercolours) and it is a solvent ink, once, as a base which you can see I started to colour, and second time to cut pieces out of it. I then stamped it a third time to illustrate which sections I was going to cut out in red, so you could see the elements I would be using the layer up.

The Pigment is strong in the Aquablend pencils, so a little goes along way. I did not colour all of the main petals on the base flower, only the edges, as I would be layering on top of this anyway. The edges do need to be coloured though as I didn't want any white coming through, from underneath the layers, when I built upon the image.

Crafty tip: Stazon will stain your stamps as it does what it says on the tin. To stop this, you can ink your stamp up with Versa Mark first, leave it a few moments and then ink your stamp up with Stazon over the top. Then stamp your image, as soon as you have done this, clean your stamp with a baby wipe and you should find it has not stained it. 

Another Crafty tip:  if you are using a waterbased Memento Ink and you find that it pools on some of your clear polymer stamps. Ink these up with Versa Mark too before over inking it with Memento.

11.   I then worked out where to position the base Iris inside the card, the layered petals did not want to be catching on the outer frame.

12.   I glued the Iris flat to the inside of the card. The reason I choose Tea Dye Distress Ink as a background, was because I wanted it to be a contrast to the colour I had chosen for the flower, this would make it stand out more and also add to the vintage theme.  Crafty tip about choosing colours coming up at the end of this blog.

13.   I took the two petals I was going to layer up. I always add a blob of glue underneath foam tape to make sure it will not come off later. I also put some glue around the edges of the petals so I could curve them, and stick the ends down, this meant they would be graduated and coming towards you.

14.   I took the Iris sentiment from the Sheena stamp set and printed it on to a long strip of card that I had distress again with Tea Dye. Both ends were then rolled to turn it into a scroll/banner. I ran a Versa Mark pen over the edge of this and embossed it with gold powder. 

15.   Usually when I make a banner like this, I curve it and place a piece of foam tape in the centre on the reverse, whilst gluing the flat sides of the roll.  On this occasion, I could not do this as it was being attached to an open frame, so I simply curved it and glued either end of the rolls to the card front.

16.   Finishing touches are all about the detail. (I do love detail, have you noticed? ;) ) I added little white spots in the centre, spilling out on to the lip, for a realistic interpretation. I also decided to add little drops of Glossy Accents, to mimic water droplets.  

17.   I added some complimentary blue pearls on the corners of the frame as this would draw the blue colour through and towards the Iris. (They are darker but look paler in the photograph.)

18.   The tag I cut out from the centre was used on the back, this gives someone a place to write a message. I decorated the back the same as the front with the embossing powders. The with love always is a Sheena sentiment and I also stamped the small Iris and leaves from the set, cut these out, coloured them and glued them flat to the bottom of the tag. 


Tah dah! Finished. :)

I hope you have enjoyed this project and seeing my thought processes (scary isn't it?) There is method in my madness, well that is my story and I am sticking with it.

And lastly here is a tip about colours, this came about from talking to a lady yesterday who said she has "got in to adult colouring," which is a wonderful hobby. She enjoys it but confessed that she doesn't always feel confident about using colours though, which ones to put together, or if they will look right. So I shared a tip with her and after talking to Sheila later about crafting, (she can't help it now), she said it would be a helpful tip on my blog

Crafty Tip:  This began as a little tip and then became something else entirely. Bare with, as Sheila said I was aiming for a side order not a main meal, "Here's something to get your teeth into," although I almost ended up gritting my teeth as this explanation turned out to be more complicated than anticipated. Why, I hear you ask? Because it seems that since my art training (and Sheila's) the terminology has changed. I'm of the opinion if something isn't broken you don't need to fix it, it's like Starburst and Snickers all over again, I am sure there is a boffin somewhere who is to blame! lol

In the good old days, (before chaos descended) we were taught that contrasting colours were those opposite on the colour wheel (red and green) and complementary were those close to each other in hue. Apparently these are now called Analogous colours, ( your teeth may fall out trying to say that word, ours nearly did.) 

So to recap, contrasting is now known as complimentary

And complimentary is now analogous

so it seems.

Anyhue, (see what I did there?) as I was going to say before my brain melted...

If you feel afraid of using colour and are not sure what to put with what, this is a useful tip. This is what I have learnt. I see shades not colours, some people who are creative naturally do this, it is innate for them, for others it may come through art training, whichever way it is a good thing to have. Consider it a crafting app! :) lol

If you are wanting to choose colours but are not sure if they will go together why not try this technique? Is the first colour you have chosen cool (soft) or warm (strong)?  If you have chosen a warm yellow or orange and need a contrasting colour (sorry, complementary), to make them stand out, you would need to choose a warm purple or blue.  This is what I did with this Iris Card, (So I thought it would be the perfect time to mention colours.)

Analogous colours

These are colours that are next to each other on the colour wheel and they harmonize well because their hues are only slightly different. 


Complementary Colours

Are opposite each other on the colour wheel, the best example of this is red and green, (which is popular at Christmas), purple and yellow and orange and blue, (put simply)


Basically, if the colour saturation is equal in all colours, they are all warm (strong) or all cool (soft) you can't go wrong. Also, there is a degree of personal taste, experiment, sometimes you can break the rules, apparently I have done this with my Iris card as this colour scheme is actually classed as 'analogous complement.' Well, that's me being a bit random again, but it worked didn't it? 


My advice, don't ever google the subject because you will pickle your brains as there is so much out there, some of it is complicated and some of it simple (lol).   I found these are probably the best links if you wish to look into it deeper.  I hope I helped...or shall I just get my coat?..

Adele
x