Hello out there crafters!
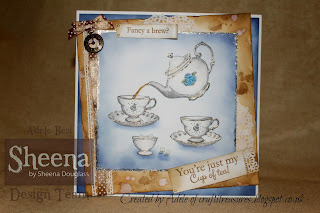
So, as you will have seen in the previous post, I made some samples for Sheena's Home Life collection. I was super excited when Sheena said my tiles were "genius" on Hochanda. :D I think it was a light bulb moment for me... make the most of it..lol. As soon as I had the idea, I knew I had to do it.
Anyhew, thought I would let you in on the secret of how I made them. It does take up a lot of time to do this but is very effective.
I took a piece of Sheena card and my Crafter's Companion score board and scored a panel with 1cm squares.
Crafty tip: Take some low-tack tape and fix your card to the side of your score board so it doesn't move and you end up with wonky tiles. Turn and repeat so you get squares.
Then next step, I took my Versa Mark pen and ran it down the grooves. You will have to do this in sections I did three rows at a time as it would dry too much otherwise. It was then sprinkled with clear embossing powder and I repeated this until the panel was finished. The squares were randomly coloured with Aquatints. ( The Versa Mark resists them so stops the ink bleeding.) I followed this by adding gilding wax to selected squares.
So I did not get gilding wax everywhere.. it happens..I cut some strips of post-it notes, and placed then around the edge of the chosen tile. Gilding wax was then careful rubbed on to this.
For matting and layering, I took some Kraft card and applied wax around the edges. I often like to use two colours as it gives it more interest.
I wanted the tile panel and the kitchen counter top to measure 7.5." So I attached a piece of card coloured with Distress Inks for the surface and then trimmed it to size.
Remember what I said about Gilding Wax getting everywhere? Yes, that... anyhew... make sure it's properly set and dry before you turn over and start playing. Luckily I was putting the mixer there anyway! Phew!
As you can see I used gilding wax and foils on the mixer and weighing scales as I thought it would work really well for this.
The other idea I suddenly had and simply had to do was sugar cubes! This seemed to go down well too, so that was good. I have to say I was a bit silly giddy when I had the thought for these, lol.
The sugar cubes were made by taking some small foam tape cubes, you can buy them small or cut them down as Sheena said on Hochanda. I sprinkled them with pure white glitter and then applied glue to the back before sticking them to the card. The sugar bowl was made by cutting the arm off the teacup.
So there, you have it, posh china and posh kitchen tiles! I hope you enjoyed this post, why not have a go yourself? :)
I'll be back with more updates and tutorials. I'm a bit behind but have a very good reason, been busy making lovely things for Sheena.
T.T.F.N peeps
Adele
x


