Monday, 13 March 2017

Temptingly Tropical with Sheena Douglass

Hello fellow crafters!

I hope you are all well out there. We've been feeling a warm breeze moving in from the tropics at Sheena HQ. Their was a heatwave in the Hochanda studio! This weekend Sheena launched her stunning new stamp collection, Temptingly Tropical and it works perfectly with her previous Laguna surf stamps.  If you love pretty birds, these are just your thing. The team have loved playing with these and for me it's been heavenly as I do love gorgeous, colourful birds.  So here are my samples I made for the shows. And no surprise it was another sell out again :D We had a feeling people would love them as much as we do!

I was so pleased Sheena drew another hummingbird, I do adore them and still wish to see one in real life, but for now, I will create my own with some help from Sheena. :)

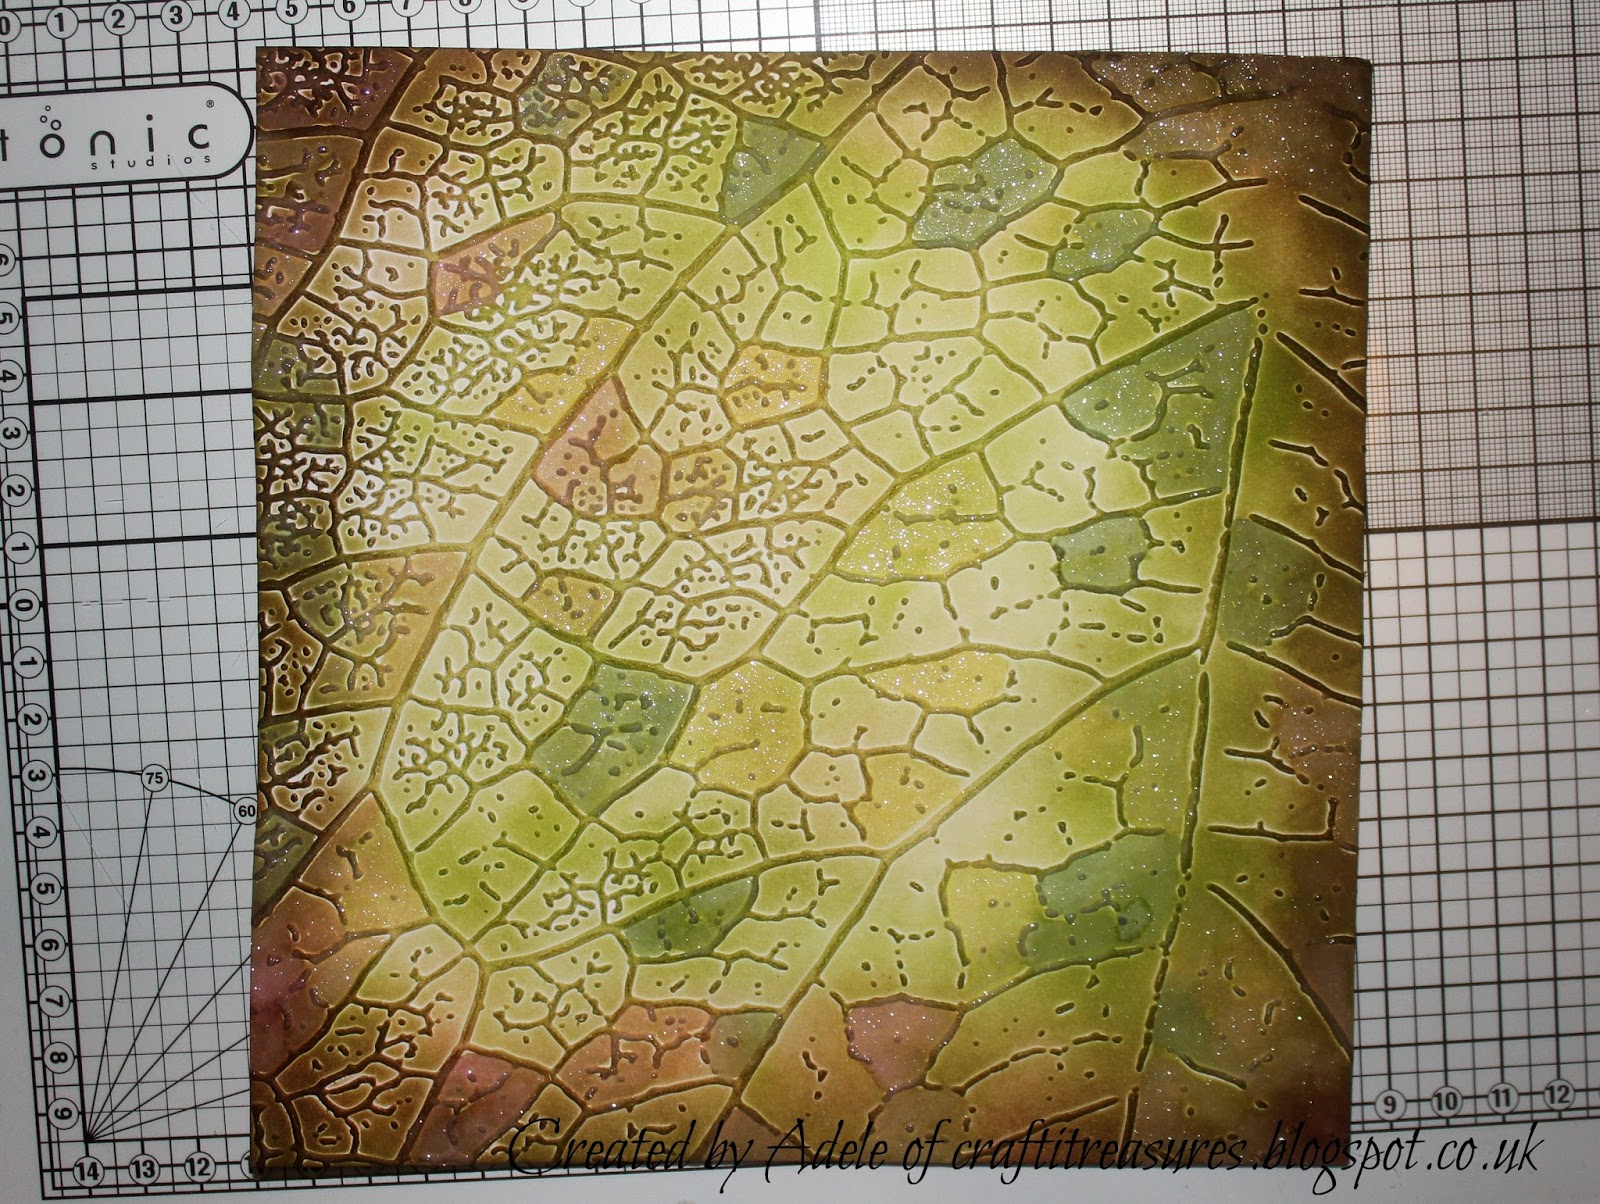
This was an 8" card. I also used the Create Flower stencils from the previous launch to make the leaf background.

This was a container I decorated. 


And now for pretty flamingos...


Amongst the collection is also a lovely kingfisher, well two to be exact, one larger sat on a branch and a smaller one in flight.


I love how Sheena captured this kingfisher hunting. This is such a beautiful image, I did not want to do much with it, just observe the stillness before the plunge. So, I created a background to represent the water splashing up when he dives and left him as the focus. I also decoupaged the wing to add depth.


People seem to have fallen in love with these little cuties! And I can't blame them. Again I kept this simple, so the main focus is on the birds. These lovebirds would be perfect for an engagement, wedding or anniversary card. 


This 6" card was made using a Sara Davies heart die and the Sheena Create a flower small dies, which came free with the recent Crafter's Companion magazine. I wanted to surround them with a heart. 


Ooh and then we have a beautiful peacock feather to play with. The background was made with the Pebeo paints and after also painting the feather with these, I then added coloured foil highlights for extra elegance.  If a peacock isn't a good excuse to use your foils, I don't know what is. :)


And the peacock himself, he likes to show off you know...again with foil accents and a Pebeo paint background. The feather is a Downton Abbey die from Crafter's and the flower Sheena's Create a flower, Sensational centres. 


And finally. I thought this scene was perfect for a calendar project. The image and sentiment lent itself well to this. Here, a tropical finch greets the new day. :)


I hope you have enjoyed this projects. I will be back with how I made these, and I haven't forgotten about the Create a Flower tutorials, bare with... ;) 

T.T.F.N peeps

Crafty hugs
x


Tuesday, 7 March 2017

Create a Flower tutorials - Part 1: Mixed media

Hello peeps!

So, thank you for all the lovely comments about my little black box. It really means a lot to me I'm so pleased lots of you loved it! I really had fun making this project and the brilliant thing is you don't need much to do it.  I was touched that people called it "classy", "sophisticated," "posh" and "elegant", that was the plan ;) . Thank you so much! :D who would have thought you could do this with black card? But I wouldn't have been able to do this without the stunning new stamps and dies from Sheena, she made it all possible!

I will talk you through it but I don't have step by step photos all the way through as camera needed charging in the midst of creating this..how rude! lol ..  ;)


So I painted small box with black gesso, two coats for strength. 


Then I decorated it with the texture stamps by stamping on to the box with Versa Mark and heat embossing with silver powder.


Both the natural petal and the fancy petal were stamped and embossed with either clear or black powder, one or the other, can't remember... I've made other things since then. ;) either will work fine though. Then when they were cool I went over them all with some silver gilding wax. And then added some silver foil highlights.


So that the middle was not bulky and remained fairly flat the circle on the end needs to be cut off and petals cut to a point. The circle in the middle that worked as a guide for me was the cut out from the Time Traveller goggles. They were positioned in a cross, then another layer of 'real' petals were added on top in another cross formation, in the gaps as you can see.  I then added two rows of patterned petals in the same way. The top was a smaller section of the large mandala stamps and then I put several Sensational centres in the middle followed by a gem to finish. Remember the petals needed to be shaped. Curling a paint brush underneath them works well. :)


This was the gold flower. I created this wanting it to look like those decorative brass bowls you see on the high street. So again this was just black card again to begin with.


The natural petals were stamped on to black Crafter's Companion card. I then took my very chunky Gold Pebeo pen and swept it across the surface. This will make the embossing super, super shiny.  (Not as shiny once wax added.) I used the pen underneath the gilding wax as I wanted a really strong gold base that was solid. It was a bit of an experiment too and it seems to work. The petals were doubled back to back to give strength. As you can see I coloured the reverse edges with the gold pen before sticking them together, didn't want any black bits peaking through anywhere. Once dry the gilding wax was then polished but I wanted a real contrast in the veins, hence the foil.


Pebeo relief was piped on to the veins so I could add foil. Petals were shaped again.  I did cut a circle base, cut off the end circles on the petals and then fanned them round. Sensational centres were added in the middle. 

I will be back with more techniques in another post, this one took so long due to technical gremlins! Pesky critters!

crafty hugs

Adele
x


Create a Flower with Sheena Douglass

Hello lovely crafters!

As some of you may already know, Sheena recently launched her Create a Flower dies and stamps. This is an amazing new collection, that allows to you to make 3 different sizes of flowers, both natural and patterned.  They are also accompanied by some fabulous stencils and texture dies and stamps. The flower dies are mixed media, so you are able to cut out a range of paper, card, fabric and much more...Ooh so many things to do with these! :D

So these are the samples I made for the shows...

Cards


The petals are great for more than just flowers. I was able to create this butterfly with them.


In this card above, the petals were die cut with canvas paper and painted with Pebeo paints. I wanted to go a bit shabby and grungy with this one, to show they can be more than just pretty flowers. 


I just couldn't resist making them also look industrial. They would work perfectly with your Time Traveller collection too, by giving them a different look, you get more versatility. And the texture dies can also lean towards this look. 


My final card was this pretty in pink bloom. I created this to grow up and out of the card as if it can be picked. You can make realistic flowers, if that is your thing, but there is nothing stopping you also making them arty and patterned by using the mandala style stamps that come with this collection.

And on to sewing...

You remember I said when I started this blog that I may in the future do some sewing? Well, this was the perfect opportunity. No zips were used in the making of this..phew! Shhhhh, I mentioned the dreaded word didn't I? ( Don't let my best friend hear, let's not mention it again - back away, nothing to see here..lol.) I've made an evening bag before and I thought these dies would lend themselves very well to this. So, as you can see, I multi-cut the petals and layered them up, adding a sensational centre, also cut from the new dies. The middle was then beaded. Some of the petals were also decorated by stamping them with the texture stamps, using Archival ink. 


This is a hand sewn brooch, created with the small petals. It was made with felt and cashmere. Again, I was able to stamp on to the fabric.


A second with cashmere, felt and faux leather.

Mixed Media projects


For this project, I wanted to design something that looked like pewter. I have a great love of the Arts and Crafts movement and these patterned petals reminded me of this, so I felt inspired and it resulted in this decorated box.  It was just black card, Silver Pebeo gilding wax and silver foil highlights.


This was a gold flower created as a bowl also with black card.


With this I hoped to show that you can create different types of flowers. So on top of this little box I made a Water Lilly. This was done by folding the petals back on themselves the other way. 


This was my canvas, using the different sizes and shapes of petals. A mixture of fabrics and papers were used and it was painted with Pebeo paints. 

So these are my projects. I'm sure you will think of many, many more, the possibilities are endless! And it's why I love these dies and stamps, still got lots of ideas myself, so who knows what else will turn up! :)

T.T.F.N

Adele
x


Friday, 3 March 2017

Word stamp techniques for Sheena

Hello again,

Just thought I would share with you how I created my samples for Sheena's new word stamps. These were a sell out on the shows and it's no wonder, they are amazing! This mix and match collection allow you to create your own sentiments. The team also combined them with texture embossing folders. The finished samples are further down in a previous post.  :)

So, firstly, the hummingbird card with words..


Created a wash with the sparkle pens and then tapped spots on to the background in other colours of sparkle pen.


Took the brick wall embossing folder and then cut out the middle. Coloured with Distress Inks and then gold sparkle pen over the top.


Coloured hummingbird with Aquablend pencils, then highlights were added with clear sparkle pen. Added an extra decoupaged wing for depth.


Stamped and cut out flower, coloured with Aquablends again and sparkle pens. Tucked it in behind the bricks. Edge was glued down but I applied 3D glue underneath the bricks in the centre to make them stand away from the background. Stamped and added the fabulous new words from Sheena.

Believe with angel wings was created like this..


Distress inks on background,


Dropped water in the middle as I wanted to create a pattern that looked like something manifesting and coming forth. 


Tapped sparkle pens and water into the centre and around so it would create patterns. Then added words and wings.

Fields of flowers


This was the background for the tall flowers. I wanted it to look like a hazy field of blooms in the background. This was created by wetting the background, adding a wash to the appropriate place and then tapping the sparkle pens over the top. 


I cut out the Sheena flower dies and coloured them with Distress Ink.


Added a thin silver foil edge to the background. Applied 3D glue behind the flowers and tacky glue to the stem and arranged them on the background. 


Stamped and cut out the new words, coloured with DI and then piped foil glue around the edge.


Bluebell wood


Used the woodgrain embossing folder, coloured with DI and then sparkle pens. If you see in the bottom right, I cut some parts away, so the black card underneath could show through, making it look like an old tree. 


Leaf and butterfly card


I love this folder too, I used distress on it and then went over the top with sparkle pens in sections, so selected parts of it would shimmer. 

Wise words


For this card I die cut a shape for the sentiment. Wet the background and tapped sparkle pens on to it.


Added a wash over the top.


Created some mats and layers with Pebeo gilding wax. I stamped the chosen words, creating the sentiment and added some honesty flowers from Sheena, as you can see, I thought they fitted the sentiment well. The background was the bricks coloured with gold sparkle pen. I wanted the words to really pop out of the centre of the card.


Tell your own story.


I made this as I really wanted you to see how you can create a really positive statement with these words as they work together so beautifully. You can really tell a story, and design a piece of wall art to lift the spirits.  I embossed the different folders, cut or tore them into sections and stuck them to a canvas. 


It was painted with Pebeo matt paints and then clear sparkle pen over the top.  The words used a mixture from the sets. They were stamped, cut out and given a gold foil edge and then stuck to the canvas with wither 3D glue or tacky as I wanted some to stand forward more. So I ended up with this..


So that's how it was done, if you would like to play too. I'll be back with more updates soon. :)

T,T.F.N

Adele
x


Thursday, 2 March 2017

Love what you do. Let your crafty light shine!!

Hello crafty peeps!

I hope you are all well and busy making lots of lovely things.

I interrupt this blog to bring you this… normal service shall soon be resumed with pretty pictures, bare with..


I was upset to learn this week that one of my lovely crafty friends had been abused online for a card she had made. There was absolutely nothing wrong with it at all, in fact it was stunning as always. But it made me think, how many fellow crafters out there are discouraged by others?  I felt kind of compelled to write this.

Craft, like art, can be a matter of personal taste. I absolutely adore the Pre-Raphaelites (proper painting as I call it ;) ) but someone else may prefer Picasso and that is there choice, it does not mean either of us are right or wrong, we just like different things.

I just found it sad that one person should choose to abuse another, over something that took them a great deal of time to make. When we create something, we pour our heart and soul into it and whatever others may think of it, it means a great deal to us. For every crafter, each project is like their ‘baby’ and sometimes if you are on a design team they can be hard to part with, lol, Even though you know they are going to a good home.

No one starts out as an expert when they begin to craft. We all go on a journey, one that continues to teach us every day, even DT members are constantly learning by playing and experimenting. We love to pass on our knowledge, so others can try things out too. And why not? Who wants to keep doing the same thing over and over? Certainly, not me, crafting is about growth and change, it’s one of the reasons I love it.


And, here is another thing, I think I should mention…it doesn’t matter how long you have been a crafter, some days nothing goes right. It’s as if your mojo got up and left and wasn’t even polite enough to ask for an excuse me. If you are not feeling it, don’t beat yourself up about it. Take a break, do something else, cuddle the cat or whatever. It will come back when it’s refreshed, like an excited puppy that wants to play and then there will be no stopping you! The cat will look at you like you are beyond any hope again, and in truth, you most probably are! But who cares? You are making beautiful things and the world will thank you for it, even if the cat doesn’t (or one grumpy, unhappy person.)


Remember if you are starting out, everyone has different skills and these change, and improve over time. People have individual strengths, you may be better at one thing and someone else another but the key is to support each other on the journey. Crafting is meant to be fun!

We all have different tastes, if you want to make a fancy card with lots on it, do it. If you want a plain quick card, do it. No one has the right to say you can’t or it’s wrong, it’s your story not theirs.

Sadly, in this day and age, with our virtual world, some think it’s ok to leave a comment, hit a button and run. It’s not and never will be. The fact that they are not in direct face to face contact with the person they are abusing, seems to make it easier, as they are kind of anonymous behind the screen. It appears this gives them courage they would surely lack in ‘real life,’ as it has no consequences, but it does. People on the end of the virtual line have feelings too, they are flesh and blood like anyone. Hiding behind a keyboard does not make them brave, in truth, quite the opposite.

So, if someone tries to make you feel bad… just take a breath… and think they must be unhappy inside themselves. People who are secure in themselves don’t put other people down, they build them up instead. If you are loving what you do, that’s what matters, their issues are not really with you or your crafty project at all, they lay elsewhere but have sadly just been redirected towards you.
The good thing about this incident was the support she did get from the rest of the group. It soon became apparent how much she is loved and thought of. And she does have a lot of skill and often amazes us with her creations. The comments were no reflection on her ability at all.


So, if you love crafting, don’t let a negative person put you down because you are not conforming to what their ideal of crafting is. There are no rights of wrongs, no one has written a rule book and even if they had, most crafters would throw it away anyhew… we’re often rebellious like that, it helps us create things we never thought we could.

Nice quote Pablo! :D 


Just think, you have made something and your soul went into it and you feel happy with it, that’s all that matters. Be proud, you’ve accomplished a goal and if others like it too, that’s great but if they don’t, remember it’s not your fault they cannot see it’s worth.


Go forth and create! Let your crafty light shine!

Love and crafty hugs
Adele

x