Wow, what an amazing weekend it has been on Hochanda, as well as Sheena being on, which is fabulous, it has also been their 1st birthday. I've so enjoyed all the antics and the bloopers..so funny.
Also, thank you so much for all the likes and lovely comments about my Northern Lights card. I really wasn't expect that. I hoped people would like it but did not expect the reception it got, so thank you muchly. It really has meant so very much to me. There was a funny moment on Hochanda when I became a Southerner, not that I was offended, I love both ends of our fabulous country and it's people but ey by gum I am a Northern lass, from t'up mountain in Yorkshire!.. I think I must have put my posh voice on when Sheena and I last spoke.. ;) To be fair, I probably sounded high pitched, like a chipmunk, as I was so excited to talk to her. lol..but she is right I am south of Newcastle.. :)
I've had a love of aura borealis (just going to refer to it as AB for the rest of this post) for many years and dream of seeing them one day, as many of you probably do too but the good thing is, if you can't find the real thing, you can bring the Northern Lights to you via the medium of Aquatints.
I've wanted to do full on AB for awhile, the image has been floating around in my head for sometime and then Sheena brought out these new dies and stamps and as soon as I saw them... ta-dah, dream can now be realized! Thank you Sheena! :) I've also been wanting to do this before I got my hands on AT's, as I had a feeling they would work perfectly for this after watching Sheena's demos with them.
There is something so utterly magical about them and ethereal and I hoped to portray that. I have a few photos saved that I have been in awe of for years. A good tip if you want to do an AB sky, google some images and see how the light plays across the sky, which colours appear and how they form and then take inspiration from these captured moments in time. Because of the medium used , AT's, each time will be unique just like the Northern Lights themselves.
So, I'll stop waffling now... so you can know how to do it too. lol :)
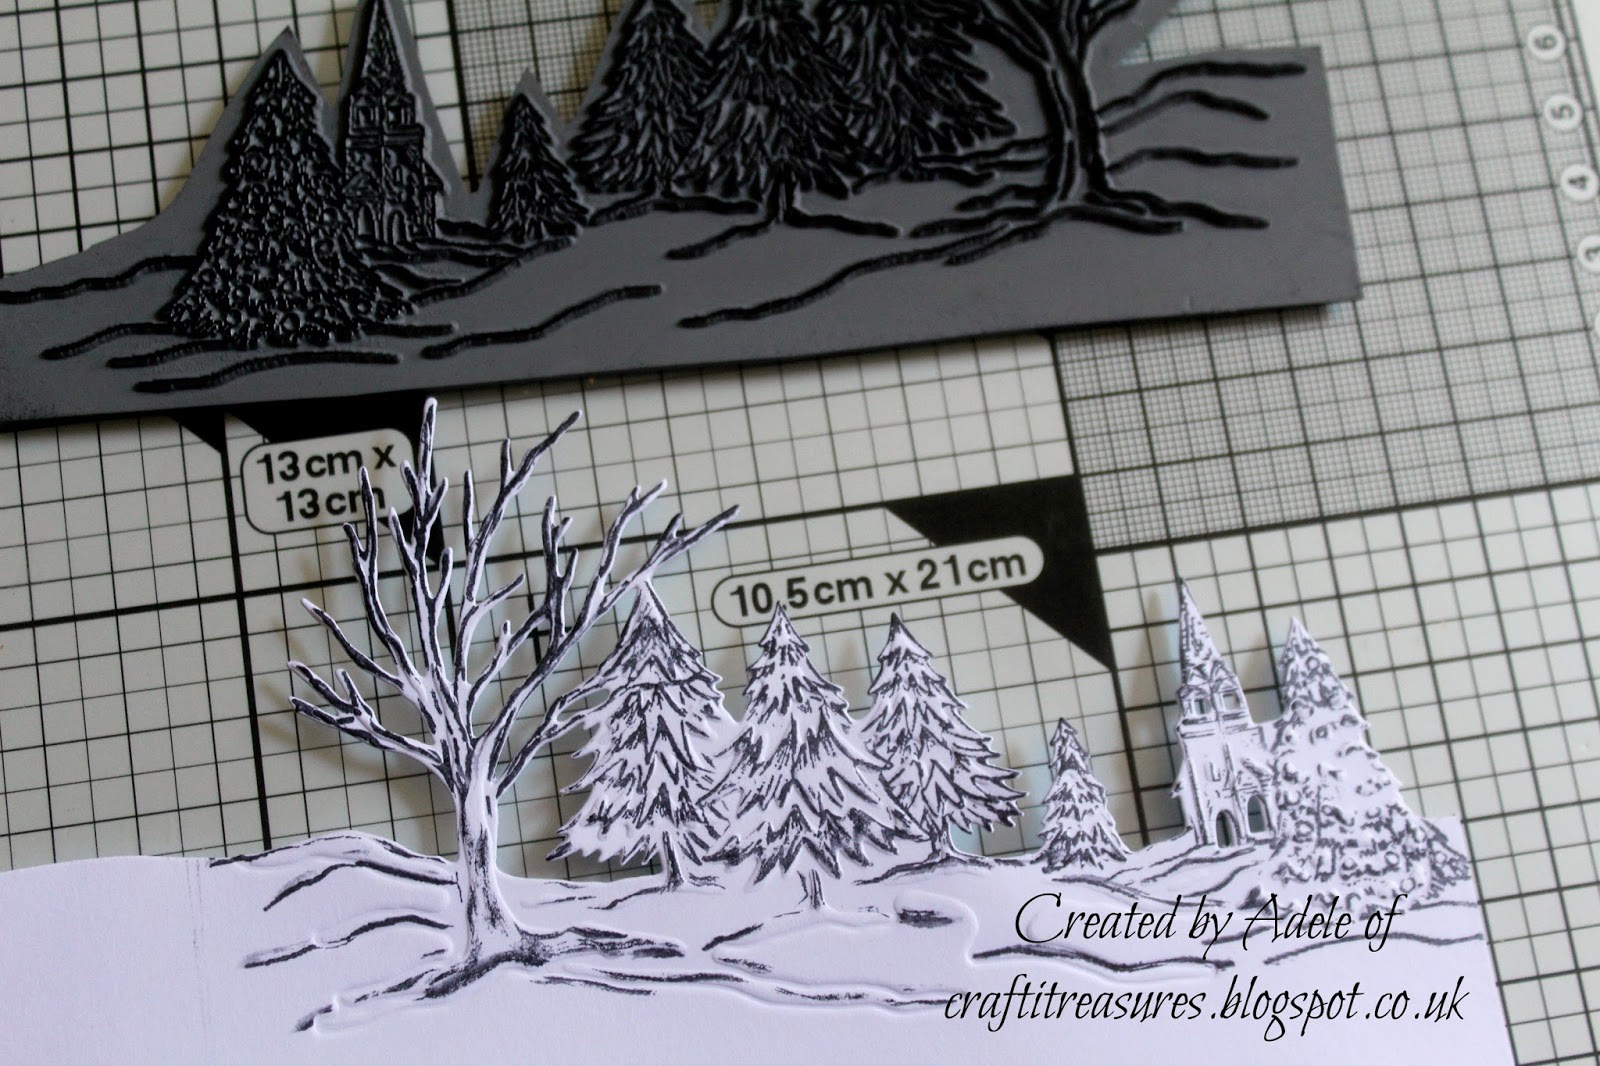
We are using these dies from Sheena's new collection Scenic Winter and the matching stamps.

This was created using an 8" card, so I cut a 7.5" square in white Sheena Stamping card and then laid the dies on to see where they wanted to be before cutting them out. I would suggest the edge by the decorated Christmas tree and church be 3" up from the bottom of the panel. This allows you a decent amount of sky and room for the other die cut trees to sit well in the scene.

The landscape was then cut into another piece of card which measured 7.5" by 6.5" as the one above was going to be used for the sky. The card panel below didn't not need to be as tall, so 6.5" will give you enough to cut out the trees against the horizon. I taped it down with washi tape to make sure it would not move. It is always best to put the tape on the bit of the card you are cutting away, then if it does damage the surface slightly, it's not going to matter as you don't need that bit anyway.
Crafty tip: Also when your cutting plates get really marked they can leave an impression on what you are cutting out and you don't really want that. So, you can put a thin layer of copy paper underneath the card before you cut and it helps. Don't throw the little arched doorways away form the church , leave them safe in the die, we need them later. :)

I then took the matching stamp from the new "Festive Greetings" stamp set.

As Sheena was discussing on Hochanda this weekend, some of the stamp images that match the dies are built into a stamp scene, this is to give you more versatility. To transfer the ink to the die cut you need to concentrate on one area at a time and then press that down before moving on the next. I started with the tree branches first and moved across. You just need to slightly jiggle the die to perfectly line up the other parts.

Then you will end up with a stamped image on your die and if you missed any bits, you can go back and press it down again. I used black Stazon as I don't have a grey yet (which I must get) and it is waterproof so perfect for use with AT's or AquaBlend pencils.
The evergreen trees die was cut out, embossed and stamped in the same way.

I then laid the scene against the 7.5" panel that would become the sky. I drew a faint line round the edge so I knew where the horizon would be, along with the church and trees.

Okay... so let's add colour! Are you ready? Brace yourselves..lol.. oh before I forget, nearly did... you will need two pots of water to do this.. One to wash your brush and one to keep clean to paint on as clean water. You will need a 3/4" smooth brush.

Well, I will hold my hands up here.. I got my greens mixed up lol... I used the green from the Landscape AT's set instead of the brighter green from the Pastel set.. forgive me, I've slept since I made the other card and crafted other things inbetween... anyhew... I thought I will stick with it and you will see the difference between the darker, emerald type green and the brighter zingy green of the pastels.
I then added the paler blue from the landscape set (03)..

For those of you out there who may be thinking... what is she doing? Bare with... I did study art at college..even if this photographic evidence would suggest otherwise...lol... it looks a bit...erm. yeah...hmmm at the moment doesn't it?... but it will change..as you can see I added the darker blue from the landscape collection too..

I did add some streaks of the paler green and pink (in hindsight not enough pink I think but it will be different every time you do this.) Now, this is when you take your clean water and clean brush and sweep it across one of the streaks of colour to blend it into the next. Then you clean it and do the same again. This softens all the edges into the next.

Then as you can see above. I added some of the silver AT to my glass matt and added water to it.I did not want it full on metallic, I just wanted a silvery hint of sparkle. I took the same brush, cleaned, and either side of the green stripes. stroked it across the sky (in the same direction only.) I did not want it all over the sky as I still wanted the dark blue patches to remain dark.

Then take your heat gun and dry this sky panel you have created. When this is done, you then take the same clean brush and sweep clean water across the colourful strokes again, in the same direction. Cleaning the brush in-between. This then starts to bleed the edges more and you end up with a feathery, streaky edge, which almost mimics the lacy curtains of colour you see in the Northern Lights. Every time you do this, the effect will be slightly unpredictable, but that is part of the beauty of it. It is important to get the balance right when doing this, you don't want to overwork the card and ruin the surface but you also want a bit of effect and texture to the sky.
Also above you can see that after it was dried the second time, I took a silver pen and dotted stars in the dark blue parts of the sky, this helps to add contrast and pulls the colours forward as it looks as if we are peaking through the green streams into the starry night sky behind, it adds depth.

A close up so you can see the bleeding..I like this effect.. I am going to play with this more. :)

Then I took the trees that were die cut and painted them with a mixture of the dark blue and green from the Landscape AT's. You can use Aquablend pencils too if you like. As it's night time the trees need to be a rich dark bluey green.

The die cut scene was then also painted with Landscape AT's. I added a paler green/yellow glow to the snow around the Christmas tree and the tree itself, to signify the glow coming from the lights.

Above, I then swept a paler green/blue wash over the white bits on the trees, where the snow would be as I did not want it to be in your face white as it would not fit the evening scene.

And next we turn to foils! Oh how I love these. Personally, I prefer this to Mirror card as it always seems such a waste to layer mirror card when most of it is hidden, and when you add Mixtion relief and foil you get texture too. This panel is 7 3/4" to matt and layer on to my 8" card. Silver was chosen as it would compliment the tones of the snowy scene better.

This is the textured finger print technique you may have seen me use on previous posts and describe in depth. I then added this to my card blank and started to build my layers. I covered the card blank in a thin piece of black card as it was cream.


Next I added the coloured scene. I wanted this quite flat against the sky, so it would contrasted with the layered trees later.
Crafty Tip: If you are wanting to stick anything down which is small and thin, like tree branches.. this is what I do anyhew...add a small spot of tacky glue to my glass matt and use a pin to place it where you need it.


I then began to add snow and and more Mixtion Relief to the Christmas tree in small dots, then this would make golden glowing lights when it was dry. I also coloured the church archways in yellow, so it looked like people were inside and glued them back in place.

To the back of the trees I then added a small amount of glue so I could attach a bit of foam tape. If you have 3D glue you can use that too. I always use glue on foam tape and then I know things won't come apart.

I only added foam to the top sections as I wanted them glued flat at the base.

This is the 3D snow technique I have been asked about, which I also used on the Robin, deer and small snowdrop card. You will need some white liquid pearls and pure white glitter. I applied the liquid pearls to the trees where the snow would be and then sprinkled the glitter over the top straight away. This gives you a raised texture rather than just being flat like other glue would be. There maybe other glues out there that do this too but I am not currently aware of them myself but the other reason for using this is that it stays white underneath. In all probability there is another glue out there that may do both of these things..so if you know of one...let me know.. thank you. :) The Dovecraft version I have used is pearlized and slightly translucent so it works well on night scenes too as it does not scream white at you, but works really well on white card as a background too.

This is the same method and same tools above.
So, as you can see below, this is the finished card, it is different to the original you saw on Hochanda but no two will be the same when you do this. I think I like the zingy green on the original and the fact that the bright green burst out behind the trees and there was more pink, ( I did this intentionally on the first one) but this one is slightly more sutble.. it just depends which one you prefer. If you like it brighter, just use the green from the pastels set instead, along with the pink. At least now you can see the difference. Knowing me as the perfectionist I am, I will go back and work on that pink bit. Ooh and I added extra sparkle with the clear sparkle pen on the snow.

I hope you have enjoyed this tutorial.. It was a long one wasn't it!...lol.. I'm big on detail.. has anyone noticed? ;) I hope you are feeling inspired to have a go too and at the end of the day, if you don't like the results first time round, as Sheena says, it's only a bit of card and you can play again. You never know what might happen.. but I promise you it will be fun! :)
So just to recap, this is what you need:
Sheena Douglass Scenic Winter :
Evergreen Trees die
Winter Scene die
Matching stamps:
Wishes of the Season
Festive Greetings
Landscape AquaTints:
(For sky)
Dark blue (08)
Lighter blue (03)
only use dark green if you want it darker.
Trees: Dark blue, green and the brown (42)
And from the Pastel set
Green (25) - for the sky if you want a brighter green
Pink (55)
Yellow (35) for light around tree.
Sheena Stamping card
Black card
8" card blank (preferably black)
Pebeo Mixiton relief paste
Gold foil
Silver foil
Collall Tacky glue and All Purpose
Dovecraft 3D Pearl Effects
Pure white glitter.
Stazon black ink or a a grey Archival would be good too.
fine silver pen.
Foam tape/3D glue.
Adele (aka Northern Lights Woman...lol.. ;) )
x
Fabulous tutorial Adele and stunning, stunning card xxx
ReplyDeleteThank you Alison :) xxx
DeleteThanks, Adele - great tutorial. Well done!
ReplyDeleteThanks Rosiejt. Glad you liked it and my crazy crafting waffle..lol.. :)
DeleteThank you thats fabolous xx
ReplyDeleteThank you Pauline.:) xx
Delete