Thursday, 20 October 2016

Sheena Autumn Inky Ink-ette challenge

Hello lovely peeps!

Well, we have been very busy here at Sheena HQ!  Another amazing launch is coming, the fabulous Sheena will be on Hochanda from Monday with her new Time Traveller collection... It's truly stunning, I can tell you, more about that later...

Now,  the teamies recently put their heads together to see how we could encourage Sheena's Ink-ettes to share more of their makes with us. I suggested a monthly challenge and then together we formulated a plan we thought would work well. So, alongside some of my fellow inkoids, I have been causing crafting mayhem! It's the best kind lol... and our cunning plan worked out very well! :) Every three weeks a inkoid will host a challenge and we invite the Ink-ettes to enter, it's lots of fun.

Seen as how I was partially responsible, I volunteered first (it was only fair lol.) So we kicked the challenge off with an autumn theme. This is one of my favourite times of year for the colours, not so much the cold and the rain but you can't have everything can you?


So this is the card I created to inspire the Ink-ettes. I do love Squirrels too. The team chose a favourite from all the entries and then Sheena shared it on her facebook page and as it was the launch and my chosen challenge, I also personally said I would share the chosen card on my blog too. :)

Coming up is the tutorial for how I made this card and the wonderful creation we chose as our favourite by Anita Dufton. 

To begin I used Aquatints to create a background. I wanted it to have that dappled light effect you get in forests. I sponged them on and then sprinkled table salt over the top. It has to be quite wet when you do this (but not too much) as the salt does need to react with the water. You have to let this dry naturally. This is a very unpredictable technique but that is part of the fun, each time will result in different patterns and I was pleased with how this turned out.


Next I took Sheena's Tumbling leaves embossing folder and ran it through the machine twice because I wanted two leaf corners. They were painted using Aquatints and then gold gilding wax was rubbed over them to bring out the detail more. 


The other leaves from the folder were then cut out.


As well as colouring these embossed leaves I also stamped and cut out some leaves and acorns from Sheena's squirrel stamp set, Little Acorn. The leaves were stamped on to paper. Acorns were stamped on to card and paper as I wanted some to sit more flat on the design and have some slightly thicker for the foreground. 


The background was layered on to kraft card which had gold gilding wax around the edge and this was mounted on a 8" card.


Foam tape was attached to the back of the corners and the squirrel. I created a branch for the squirrel to sit on by scoring some texture into a piece of Sheena card and painting it with Aquatints. I was still deciding on some of the loose leaf layouts.


Began to add my elements...also used Sheen's Autumn branch die...


I hid some of the acorns throughout the card as you will see in the finished photo, as we know squirrels love to stash them! 

This is the wonderful creation by Anita Dufton that the team chose as their favourite. Isn't it beautiful? We loved the choice of colours and the layout, we felt it really captured the spirit of Autumn. Well done Anita! :) 


So lots of fab things coming up from Sheena next week! Prepare yourselves folks! You won't want to miss it....here is a sneaky peek for you...


Being a Steampunk myself I can't tell you how excited I am about this collection!!!! eeek... and breathe...steampunk is very craft orientated and members make their own costumes and things..It is also about story telling and character creating, therefore, with this in mind, some of my makes for this collection will tell a story..firstly, I would like to introduce you to Sir Edward Harrison, inventor, here we greet him as he steps off his time machine and surveys his surroundings.. The Time Traveller shows start Monday the 24th on Hochanda (times yet to be announced) .... ooh I can't wait. bet you can't either... maybe I shall have to have a word with Sir Edward and ask to borrow his time machine!!

Adele
x


Monday, 10 October 2016

Majestic Stag diorama card with Sheena Douglass

Hello lovely crafters! 

I hope you are all well. It's my turn do to a Sheena inspirational post again. :) I've had this in mind since I saw this die and have been waiting to create this to show you. It seems quite apt now too, after the weekend, as Sheena was on Hochanda with the wonderful Scenic Winter collection. And the good thing about it is, it's not just perfect for Christmas scenes as you will see....

The majestic stag surveys his surroundings, in the beautiful landscape of..... I watch a lot of Attenborough...can you tell? :) 


So, I started by taking some Sheena card and cutting it down, long ways to 15cm on my trimmer. I then scored a panel of 15cm in the centre and either side of that scored seven 1cm panels and then just cut away the little extra that was left. 


I will list the stamps used at the end. :)  Another panel of 15cm by just slightly smaller than 15cm was cut, to accommodate the crease that helps to create the diorama. I stamped on to this the hill scene, used Distress Ink for the sky, Aquablend pencils for the mountains and Aquatints for the grass. I thought some pretty heather on the hills would be nice. I do like to see the heather.  This Ruins stamp is fabulous! One of my favourites, used this quite a bit. Attached the hill scene to the centre as you can see. 


As it was easier and less messy used red tape to stick the castle in the middle of the diorama. 


Cut out and stamped the die and colored trees with DI's and the stag with Aquablend pencils. I cut out an extra frame for strength with the large square die from the Gemini machine. You don't have to do this but I like some extra strength to it. 


Glued it to the back.


Then it was time to attach the stag to the rest of the card, again I used red tape as it's strong (for those of you who have not used it, it's the equivalent of superglue in tape form! A must have!) 


And another angle of the finished card. 


I hope you liked this project and it has inspired you. I enjoyed making this. I think next time though I would also use DI's on the outer sides before I creased it. There are lots more amazing things coming up from Sheena and the team....so watch this space! :)

I have used:

Enjoy the silence stamp set
Castle Ruins stamp
Scenic Winter Christmas Deer die
Scenic Winter Wishes of the Season stamp set

Aquablend pencils
Distress Inks
Aquatints Landscapes.

Adele
x

Ps. Ok, so the gremlin that wouldn't let me add the photos to this blog post initially has now decided to change the font halfway through again, I promise you I didn't touch it...and I can't change it...so apologizes that it looks odd again.. I hope I can find the little tinker and then I can lock it up and throw away the key!


Thursday, 6 October 2016

Sheena Christmas Embossing folders launch.

Hello lovely peeps!

How exciting Sheena is back with us tomorrow on Hochanda and throughout the weekend! Shows start at 10am tomorrow. This time she is bringing us some gorgeous new Christmas embossing folders. They work perfectly with some of the older festive collections and also combine with the recently launched Scenic winter dies and stamps too!  What's not to love?


This one below is actually Cadbury purple... ( I must not think about chocolate I will zone out again..lol)  but the photography changed the colour..


As you can see this folder works well with the Scenic Winter Stag stamp and die.


And now for something a little bit different... I decided I wanted to create an album which looked like someone had been collecting vintage festive greetings over the years and had sentimentally put them in a book to treasure... You can do so many techniques with these fab folders... I was going for a vintage/retro/graphic style with these, and I hoped they would tell a little Christmas story...


Just thought I would mention, you can also keep up with my Sheena makes and blog posts on my crafti treasures facebook page. :) 

So tomorrow is the big day! You won't want to miss it and Sheena will be sharing all her wonderful techniques as always. And, as usual, I will share some of my techniques, used to create these makes after the shows. 

T.T. F. N. peeps

Adele.
x


Monday, 26 September 2016

40th Anniversary card with Downton Abbey dies.

Hello crafters!

Oooh autumn is definitely here isn't it? I have to say I do love all the colours of the season when the leaves change, the weather not so much, but you can't have everything right? I've just made an autumnal card for a new Sheena challenge project....which I loved... more about that another day.

Today, I thought I would share with you a card I made very recently for a special surprise 40th anniversary. I decided to use my Downton Abbey dies from Crafter's Companion, I adore these and thought it was the perfect opportunity to use them for a memorable occasion such as this.

I used a technique I've only just started playing with, using embossing powder with an embossing folder.  Now I'm thinking, why did I not try this sooner? I may be making up for lost time now! A brayer was used to apply Versa Mark on to the reverse of the printed side of the embossing folder. The surface of the card was then sprinkled with red glitter Wow Powder after it had been through my machine. Then it was trimmed to the edge.


A selection of Downton Abbey dies were cut out, in gold mirror, kraft card and black card, along with the Roll Up Flower die from Sara Davies in red. Gold Gilding Wax was added to enhance the detail on some of them.


And now I have to say a HUGE thank you to my fellow Sheena Teamie Samantha for very kindly cutting out the die cut words and posting them to me. (I was sadly lacking in wording for this celebration! That is something that needs rectifying in the future!) She is a star! :) 


For such a special occasion, I wanted it to be a showstopper of a card, so created it as a diorama. Red Wow embossing powder was added to the Downton lace trim for the edge and I shadowed the black card in front of mirror card for the front lace trim, adding highlights with the gilding wax. It took quite awhile to make but I loved creating this for its recipients. 


I shall be playing more with my Downton dies in the future...so watch this space folks! 

Adele
x


Monday, 19 September 2016

Day of the Dead folder tutorial techniques for Sheena

Hello lovely peeps!

I hope you are all well. I've been very busy with lots of crafty things but...better late than never, here are some of the techniques I used on Sheena's Day of the Dead folders as promised.  I so loved playing with these! Are you sitting comfortably?  You may want to make a cuppa first! lol... Ready? Let the marathon begin...

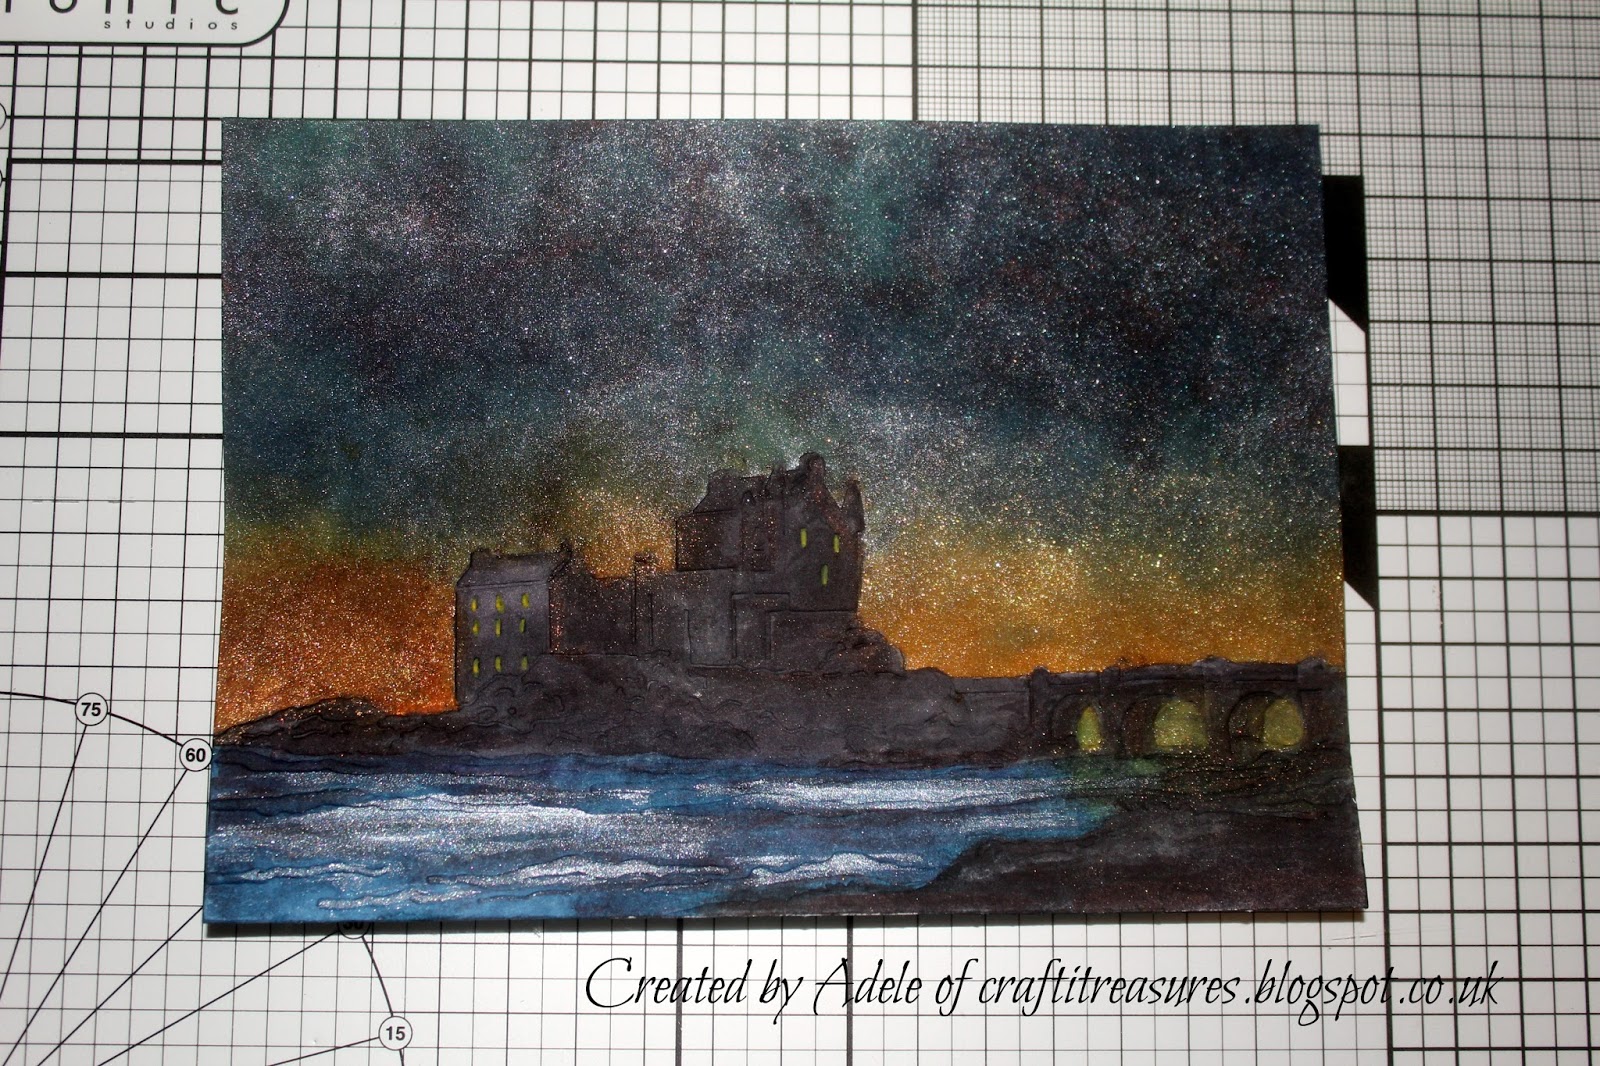
So where to start... lets start with the scenery cards.. so for these I used the Castle on the Water and the Storm Brewing folder and embossed them through the machine on white card. Pebeo drawing gum was then painted on to the raised up images.


I'll follow through one at a time now. The landscape Aquatints were sponged on the surface, dark blue, green and a hint of silver, watered down from the essentials set.


Then, after rubbing off the drawing gum,  I painted clean water on to the clouds and then added bits of the blue and black AT's and as you can see it bled to make patterns, this helps capture the fluffiness of the clouds if you know what I mean.


Then you end up with this. Pebeo Mixtion Relief was then added to the lightening forks, followed by silver foil.


The next step was to cut out some black card to create the diorama. This measured just a few millimetres more than the folder when the image is trimmed to the edge. Either side you then score two, two centimetre wide panels, these will become the edges to glue together.


Attach your image to the back of this panel. 


Another panel was cut out for the front, the same size with a window in it. Sheena's Old Tree die was then taken and die cut in black card twice. I applied silver gilding wax to one of them and gold to the other. 


So after all of the bits were brought together I ended up with this. 


Now... back to the spooky Castle on the water... I used the Landscape AT's again. I wanted to create and eerie look to the sky so blended the earthy yellow tone into the blue, adding a hint of watered down gold to the ochre colour and watered down silver to the blue. 


After rubbing off the drawing gum again, the black AT's were then used to paint the castle, rocks and bridge. The blue was painted on the water with highlights of silver as if it was catching the light of the moon to be added later. The light in the windows was added by Aquablend pencils.


A small die cut circle was drawn around and I used a white Pebeo marker to create the moon, this was followed up by adding a shimmery glow around it with the silver AT's. Shooting stars were also applied with Mixiton Relief and silver foil. As you can see this was then attached to a panel for the diorama again.


I wanted the sky to blend across the diorama so applied the same techniques to the front window panel. 


The inside of the front panels were strengthened with spare strips of black card, and the excess cut away, this would make a sturdier frame when the tree was attached. So, as you can also see, the very end 2cm strips were glued together to build the diorama. 


Then this is the end result. :) 


Moving along to the skull card.. for this card I combined Sheena's skull die, the top hat from the Day of the Dead Union of Souls stamp set and Sara Davies Just for Men Cogs and dies with the skullduggery embossing folder.


I also used the Grunge Band stamp set with Gold Memento ink. The folder was embossed with kraft card and gilding wax was used on it. Gold foil was applied around the edge.


Decided to add a bit of foil to the background too so it would tie together nicely with the rest of the card, but, in a subtle way so it would not be too much. I flicked spots of the liquid Pebeo foil glue on to the black card.


When it's dry you end up with this. The really good thing about this technique is you can use up all those foil sheets you don't think are of any use anymore because they have been heavily used previously, these are perfect for this as it only needs tiny spots. So don't throw them away just yet! :)


I built up the matts and layers. The gold one is kraft card with gilding wax applied round the edge.


I took some wooden swirls. coloured them with the gold Pebeo pen and then added Mixition Relief to them and patted it down with my finger and applied gold foil when dry.


I then brought all the bits together and created the card. Tea Dye and Walnut Stain Distress Ink was used on the skull. The cogs were coloured with gold and copper Pebeo pens or embossing powder as I wanted different textures and shades. Skull was shaped and curved to add dimension. It was glued at the edges but had foam tape in the middle.


And now for the Rambling Rose folder with the Forever yours stamp.. embossed on to black card, I then used gilding wax and the gold Pebeo pen to highlight the rose. 


Colour was added to the flower with a Aquablend pencil. Don't worry if you get a bit of red on the gold you can touch up with the gold pen again.


I took a panel of white card and stamped it with the rose from the Forever Yours set. 


Painted the roses with drawing gum to protect them.


I took the pale yellow and orange from the pastel AT set because the other yellows would have been too harsh in tone but I wanted a richer colour base for when I applied the Distress Ink. I sponged it on and the added over the top watered down gold.


Darkened with Distress Inks, Tea Dye and Walnut Stain.


Rubbed away the drawing gum.


Added colour with Aquablend pencils.


Mix colour with water.


I then added shadows around the roses to make them seem more real, blended out with water.


I took a panel of black card to matt and layer with and applied Mixition relief, adding texture with my finger. 


Added foil when dry.


Stamped and cut out the lady from the stamp set, along with other sections I wanted to decoupage. She was coloured with the Aquablend pencils.


Sentiments were then added to finish the card.


And that was the cards (as seen on screen ;) finished! :) Are you still with me? lol..  I might even be back another day with the Terminator card! (See what I did there?) As that was an extra that was not on the shows but I couldn't stop playing with these lovely folders! 

I hope you have enjoyed this..coming up soon is another inspirational Sheena post so watch out for that. 

T.T.F.N peeps! :)

Adele
x