I hope you are well out there! Sheena recently launched her amazing new Christmas collection on Create and Craft, and the team loved working on these beauties! She has brought you snowy outside scenes and warm, cosy rooms and trimmings. These designs are perfect for decoupage and you know I love a bit of that. We were also introduced to some fantastic new inks which are light fast, so what's not to love!? And, some fabulous new card, which is called Willow, now, who could that be named after?
First, let's see what is going on inside, it's time to hang those decorations. 😊What is also great about the new inks is that, similar to oxides, you can layer them on top of each other. For this background I initially fully wet the card with with clear water, and then sponged on watered down ink, yellow, orange and magenta, added salted, spritzed with more water and then left to dry. Once dry, I then went back in with watered down blue ink and sponged over the top again. This gave me a colourful lights glow, and I wanted the blue to complement the baubles to come. I stamped some of the pine branches in grey and then more over the top in black to create depth, painted and added white highlights. The small baubles were also stamped in grey on card for the same reason and glued flat to the background. We also had some wonderful coloured card on the shows, brights and darks. So I was able to stamp and emboss some of the decorations on to that, as a base, and it works really well, shading them with the inks. So they were decoupaged on this card, including the feather, which was embossed in the appropriate colours, in the right place, before being painted.
I love this pretty birdy! Again, this was stamped and embossed on to the coloured card. I decoupaged the wing and added extra tail feathers.
And who doesn't love a poinsettia at Christmas? It also comes with some gorgeous embellishment stamps.
Let's not forget about a festive rose....decoupaged again...
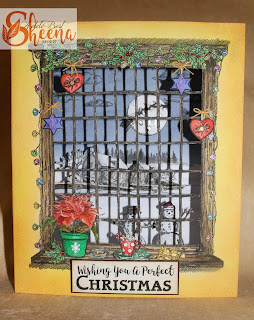
Now, it's time to see what is happening outside, there are cottages and forests to play with and much more... Sheena has given us the corner of a window, from which we can keep an eye on the world. As you can see, there are also things to trim the ledge with.
This was an idea I had as soon as I saw the window. I stamped the first corner, flipped it, stamped the diagonal corner and then drew the rest in myself. And I managed to get it straight first time and only had to do this once. I was overjoyed! lol It does mean, if you do this, that you have to cut out the panes as a few of them will not meet exactly, but that was what I wanted to do anyway in order to create this diorama. It meant I could combine stamps from across the collection and set the scene for Christmas eve. The trimmings were all decoupaged on to the window, The snow people were one layer, and then the houses another and then the final background with the trees and Santa Claus. I really had fun making this, it took a long time but I knew it would be worth it. You know how I like a quick card! lol ;)
Night has fallen on our scene... and the Northern Lights are dancing. I was able to achieve this by using the inks with glycerine to make the sky. When it was dry, I went over the blue, applying yellow ink with a brush, I then added green over the top and then green Stickles for a bit of sparkle.
Morning has broken and the cheery robin is up and about... The post and this little fellow were decoupaged on to the scene, I even decoupaged the ivy! What can I say? I'm obsessed with layering! I created branches by turning one of the trees upside down and stamping a section of it.
I hope you are now feeling the spirit of the season. We loved playing with these and we are sure you will too, so many possibilities! Also, they don't have to be just for Christmas, have a play with the scenes, many of them will work for all year too, I know I will..
T.T.F.N.
Adele
xx


