Wednesday, 29 June 2016

Day of the Dead card with Sheena Douglass

Hello everyone,

Well I don't know where the sun has gone in the last few days but at least I don't need to water my hanging baskets and flower pots at the moment...on the plus side..

It may be gloomy outside but I thought I would make a bright and cheery card.  Sheena Douglass recently announced she is looking for Design Team members and as I love her and all she does I just had to apply. It's such a wonderful opportunity, so I have made this card as one of my entries. I'm keeping my fingers crossed. Please wish me luck!

As soon as I saw Sheena first demonstrate the Day of the Dead collection on Hochanda I thought oooh I need those! They are perfect for making cards for my Goth/Steampunk friends and they are so different to anything else out there.

I also, quite serendipitously, came across some glass cabochons with a skull image. Sold!! I knew they would be perfect with these stamps. I love it when a plan comes together :) The colours were picked out from this. 

The card base was covered in black card which I then gold embossed with Sheena's Anemone stamp, I also used this to create the 3D flowers. The leaves came from the Wild Rose Briar die set as did the black flower centres (to compliment the background.)  Distress Inks were used to make the purple, speckled square panel which was edged with gold embossing too.  Again, I turned to my AquaBlend pencils to colour this image and the flowers. It was finished by adding the Amor Eterno sentiment. 

I am currently sighing over the beauty of the new Downton Abbey dies by Crafter's Companion on Hochanda as I type...I think it is impossible to save money as a crafter! lol... 
(starts to make a wish list and hopes for lottery win! )
Note to self... remember to buy ticket!  It helps..

I hope this card has cheered up a grey and dismal day for you. Back soon with more crafty makes..

Adele
x


Sunday, 26 June 2016

Guess How Much I Love You card

Hello lovely peeps,

I hope you are all well. Sorry I haven't been on for a few days, I've been a bit busy, this also includes crafting of course! I'll show you what else I have been making in other posts... I've also started a crafting journal so I don't forget any ideas (as I have so many ;) ) So I have also been doodling away with thoughts for future projects.

Today, I thought I would share this card with you. These stamps came free with a recent magazine (Papercraft Inspirations) and as soon as I saw them I had an idea.  They reminded me of that very famous children's book by Sam McBratney and Anita Jeram called 'Guess How Much I Love You.' I know in the book the characters are hares and these are rabbits but these stamps instantly made me think of the story.

I decided in tribute to the book, to make this card into a mini version, so each picture told a story with a reveal at the end. I die cut three square panels for the artwork and then created a crease down the left hand side that would work as the spine. Matts and layers built the card base, kraft card was good for this being brown, it complimented the theme.


Ribbon was wrapped around the layers as this would tie the book closed.


I then began to add the pages of the book and all you need to do to read the story is undo the bow....Guess how Much I Love You...

And the big reveal of how much Love there is, is on the last page...


As you can see I then added die cut ferns and grass (icicle die from Crafter's Companion) and flowers in various sizes. 

I hope you have enjoyed seeing this project as much as I did making it.

More of what I have been up to lately coming up soon.

Adele
x

Thursday, 16 June 2016

Musical Easel Card with Creative Stamping Magazine

Hello everyone,

I thought I would share with you a card I made using the wonderful musical stamps that came with issue 31 of Creative Stamping magazine. This is one of my favourite card making magazines, you always get such lovely stamps. I shall be working my way through these and making more projects with them... but this is my first!


It began by taking a 6x6 card blank, turning it into an easel card base and matting and layering the front panels and the back panel. From the magazine stamps, I've used the piano, keyboard, musical notes and the sentiment.  These were combined with musical sheet paper, a Spellbinders trellis die Spellbinders butterflies and various flower dies from my collection. Black Stazon ink was used to stamp the images and I've added gems and pearls to finish. 

I've already got lots more ideas for these stamps... so watch this space.

Adele
x

Tuesday, 14 June 2016

Father's Day cards

Hello crafty peeps,

Well it seems the weather has taken a turn for the worse.  We haven't seen the sun for a few days, it's hidden beneath thick clouds and rain.  What a shame!  Hoping it returns soon but that is the British weather for you....let's hope the sun is shinning for a particular special day...

Father's Day is just around the corner so I thought I would share with you some cards I have made previously... I'll share this years with you after the day.

Dad's can be hard to buy for sometimes, they get to an age where they have most things but at least the choices for crafting for men over the years have improved.  Thankfully, we are no longer limited by pictures of golf, fishing and football. There are wonderful stamps and dies out there now that allow you to create something really unique and quite hip!


For father's who like music you can check out the Stampendous guitar stamp ( Acoustic Sounds.) Sheena Douglass also recently launched a great range of musical stamps and Sara Davies currently has her Just for Men signature collection stamps and dies, both available at Crafter's Companion.


Or you could also turn to Leane Creaftief dies. I love their dies and they are a very good price too. 


These car stamps from Joy were wonderful, I taught a class with these last year. I say were as they quickly became unavailable which was a great shame because as you can see there are seven cars and six sentiments. I paid around £12 for these which I thought was an absolute bargain. I've looked online and they still don't seem to be available but keep an eye out if you like them because you never know, they may turn up somewhere for you. 

Good luck with all your Father's Day projects! Please don't be afraid to comment or ask me any questions, I don't bite, promise. :)


Stamps and dies:

Stampendous Acoustic Sounds
Leane Creatief Violin die and Musical Symbols stamp set
Joy Retro Car stamps

Adele
x


Thursday, 9 June 2016

Alice in Wonderland card

Mad Hatter: “Have I gone mad?”
Alice: “I’m afraid so. You’re entirely bonkers. But I’ll tell you a secret. All the best people are.”
Tim Burton's Alice in Wonderland 2010

Hello everyone,


If you are going to go bonkers over anything, let it be crafting, that's what I say! I'm hoping to see the new film, Alice Through the Looking Glass.  I've always been a fan of this book and the films and it is also a favourite with many of my Steampunk friends and not just because of the clocks and pocket watches...We like something a bit alternative that is very creative, so it has inspired many of us in our group. 


“Why, sometimes I’ve believed as many as six impossible things before breakfast.”

― Lewis CarrollAlice in Wonderland

The above would apply to me if you change it to Why sometimes I think of as many as six craft projects before breakfast!   

It's true...oh well... I might be bonkers after all! But on the plus side, family and friends are always pleased with the things I make for them. :)


I made this card a few weeks back. I've made Alice cards before and have actually taught two Alice card making classes last year to celebrate it's 150th Anniversary. I set it out as a tea party, everyone had place names and there were Jammie Dodgers and other treats. It was great fun. 


If you want to make an Alice card the best thing to do first is to think of all the key elements that come to mind when you remember the book.  Playing cards, roses, a crown, clocks, the Mad Hatter, teapots, a key, a drink me bottle, flamingos, a white rabbit, to name but a few.  If you incorporate some of these people will instantly know you were thinking of Alice.


I was really pleased to come across a flamingo die free with a craft magazine recently. I had seen others but was hoping to find one the right size which was more realistic and this one fitted the bill! (sorry, I'll get my coat.) I'm still on the hunt for hedgehogs, of the small die-cut variety.


For this project I used a 6x6 card and mounted it with kraft card. The most obvious colours for Alice creations are red, white and black, (like playing cards) you can use brighter colours too, and I have in the past. Sometimes though, a limited colour palette works really well.


So this was designed with a die cut key, playing cards, a crown, a lace trim and the flamingo, which was cut out three times. The second time was so I could layer the wing up and the third time in black as a shadow so it would stand forward from the card, enhancing the detail. Chequered paper was chosen as a background to represent the entrance to wonderland. The key was a symbol of the door Alice went though, the roses, hearts and crown were for the Queen, as well as the hints of gold (with embossing powder) the doily the tea party. The confusion of the place was shown by the 'This Way', 'That Way' signs which I made myself. It was finished by scattering tiny hearts around the edge.


I hope you have enjoyed seeing this project. Why not have a go at making an Alice card?  Now would be the perfect time and who knows what you could create...."curiouser and curiouser!”

Adele

x
N.B  Well, it would be this post that went completely bonkers wouldn't it!? For some reason beyond my control, and totally inexplicable, the technology gremlins (or was it the Matter Hatter?) have hijacked this post. So apologises for the font changing, type, size and apparently colour ( according to Sheila) throughout the post.  I did not do this and am apparently unable to fix it.... although I am told it is still readable...even though it does look marvellously mad now..... I need a cuppa.. 


Wednesday, 8 June 2016

Pretty Dahlia card with Sheena Douglass stamps

Hello lovely peeps,

I've been wanting to use the dahlia stamp from Sheena Douglass for awhile now since I got it. Dahlia's are one of my favourite flowers, so bright and beautiful and so much variety.  I especially like the ones that are a different colour in the centre, they remind me of sweets (not that I eat them) or raspberry ripple, some of them are truly stunning. For this card, I decided to go for pretty in pink with a peachy centre. 


I started by taking a 6x6 card blank and cutting out the Downton Abbey classical Edge die from Crafter's Companion.  

The Dahlia was then stamped and cut out several times but in different layers so it would give it depth and make it more realistic.

The larger bud was also stamped and cut out twice so I could used the same technique on that. 
Leaves were cut out too. All of these were coloured with Crafter's Companion AquaBlend pencils. 


I cut two panels of white card one for the front of the card and another for the inside, these were coloured with Colour Cloud Summer Sky ink. I gathered everything together to arrange them.

Then I decided (as you sometimes do as a crafter, things can change half way through) that I wanted to add some more layers to the centre of the flower as it looked too flat compared to the rest. So I cut out the middle petals and the front petals to layer again. 

This was coloured and I only glued the very bottom edge so the petals would stand up, adding depth.


The Dahlia sentiment was stamped and cut in to a banner and added to the card.  This is the finished design. :)


I'm sure it will not be the last time I use this stamp, after all there are so many colours of Dahlia's to choose from. :) Worth googling them, you will be amazed ...sigh... isn't nature just beautiful?

For this project I have used:

Downton Abbey Classical Edge die
Dahlia Stamp from Sheena Douglass
AquaBlend pencils from Crafter's Companion
Colour Cloud Summer Sky ink
Tea Dye Distress Ink

Black Stazon
(Inked my stamp up with Versa Mark first and then Stazon over the top so it would not stain my stamp. If you clean it with a baby wipe straight away all will be well :) ) 

Foam tape and glue.

Adele
x


Monday, 6 June 2016

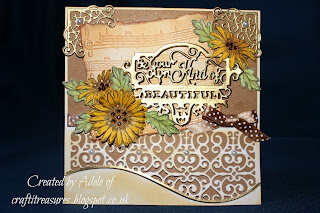
Beautiful Sunflowers card tutorial with Crafter's Companion.

Hello crafters,

I hope it is sunny where you are too. I'm still not 100% but I have been so very bored. I feel slightly better and hope that continues in the right direction. My craft stash has been calling out to me and missing me I think (and I've missed it in return), so crafting therapy it was....

I've been wanting to play a bit more with my Downton Abbey dies from Crafter's Companion and the Sunflower stamps from Sheena, so I decided to combine the two.  Sunflowers are so very jolly and they always make me smile.


This project began by taking a 6x6" card and cutting the Classical Edge from the Downton range in to the lower section of the card blank. A musical embossing folder, that came with the Crafter's Inspiration magazine and die cutting a Prestige sentiment,' Be your own kind of beautiful.' I also took an A4 sheet of kraft card and sprayed it with gold ink.

I decided I did not want to cut away the bottom section as the lace edge would then hang loose like a curtain above this and I could add some yellow Distress Ink to this lower part to complement the sunflowers.
A panel of Kraft card was cut and inserted inside the card blank, behind the die cut lace.  A second smaller piece was then cut for the front top section, the bottom of this was edged with golden polka dot ribbon.


The Sentiment and Downton opulent corners were embossed with gold powder. I then took a Versa Mark pen and drew along the bottom edge of the lace trim so I could highlight this with gold embossing powder too, to tie the design together. Scattered Straw Distress Ink was lightly wiped over the lace with a sponge and below and around the remaining white portion of the card.

Then I turned to Sheena's Wonderful Day stamp and die set. These are called 'Perfect Partners' as they fix exactly. After being cut and embossed, the Sunflowers were then stamped. The best way to do this is have your stamp inked up and take your die cut to the stamp face down and line it up. I used Memento Rich Cocoa as I wanted them to compliment the colour scheme and look more natural.


The flowers were then coloured with alcohol pens, the centre was darkened with Walnut Stain Distress Ink. Crafter's Companion AquaBlend pencils were used on the leaves. 

I gathered everything together to arrange the design. The white card which was embossed with the musical folder was coloured with Tea Dye Distress Ink and a touch of Scattered Straw. I used a technique on the edges that I suddenly thought of a while ago and use quite regularly to age something.  No one showed me how to do this, it was just one of those Eureka moments, I tried it and it worked and I liked the results and always return to this when required. I also glittered over the top with a Memento Galaxy Gold ink pad. 


Crafty Tip: 

If you want to age something, make the paper look old, this is a good and easy method. Tear the edges of the paper gently towards you. Always tear towards you and then you get the rough edge on the top side (the right side) of your paper or card. Use Distress ink, Tea Dye is generally best for this. Then take a dark brown alcohol pen and flesh coloured/natural alcohol pen.  Firstly, run the chisel end of the brown pen over the rough edges, side on, not over the top, you only want to catch the ends. Then after you have done all the sides like this, do the same with the flesh coloured pen over the top. This will then blend the colours and leave you with something that seems as if it is burnt on the edges. How dark you make this is up to you. 


You can't really see it in the photograph above but I cut out the sentiment a second time in dark brown card and used it as a shadow beneath the gold one. This added depth and lifted it forward from the background. I doubled layered the main sunflower too as you can see (glued flat.) The side blooms have foam tape underneath them.  I added the bow and then white pearls to match the ribbon and bring the design together.  Brown gems were added to the centre of the flowers. I realized again whilst making this card, I really must get some dark brown liquid pearls for the middle of blooms!  Note to self: Must remember to get brown liquid pearls!  (Let's see how many more times I forget... several more at least no doubt...part of being a crafter too many things to think about! lol) 

I hope you have enjoyed this tutorial. I think this is the kind of card that could bring sunshine into someone's life all year round. Perfect to put in a frame and keep. :)

Crafty items used from Crafter's Companion:

Musical embossing folder
Downton Abbey Classical Edge die
Downton Abbey Opulent Corners die set
Sheena Douglass Wonderful Day Perfect Partners stamp and die set
Die'sire Prestige die Be Your Own Kind of Beautiful
AquaBlend pencils

Other crafty bits:

Distress Inks : Tea Dye and Scattered Straw
Memento inks: Rich Cocoa and Galaxy gold
Versa Mark ink pad and pen
Papermania fine Gold embossing powder
Kraft card
Gold spray ink
Gold Polka dot ribbon
Brown gems
White pearls
Foam tape.


Adele
x


Saturday, 4 June 2016

Magical Fairy Box

Hello lovely crafty peeps,

I hope you are all well. I'm a bit out of sorts at the moment with a chest infection so haven't done any crafting this last week or so. I am hoping to feel better soon as I hate being ill and now my head is over flowing with crafty ideas!

I have been planning to share this with you for awhile, this is a decorated fairy box made a couple of months ago.  Again, this was something I had in my mind weeks before I actually made it. Sometimes you have to store ideas away....

It began with painting the box with Docrafts paint, a shade which I mixed.  To add texture, colour and shimmer, metallic paint was sponged on to the surface of the lid and around the sides. Two circles were cut out with Tonic scalloped circle layering dies. One larger in black and then a slightly smaller one in dark blue card. This was then sprayed with metallic inks as I wanted a magical background.


I used a set of silhouette stamps which included a fairy, a wildflower meadow and a sentiment. Versa mark was used to stamp the fairy and grasses so I could emboss these with black powder. I used Silver glitter embossing powder for the magic sparkles and the sentiment at the front of the box. 


Flowers and butterflies were cut out with Spellbinders Marisa's Bouquet and the flourishes were provided by Tonic Regal Fern. These were then painted and layered, shades of purple blue and green were mixed. 

The fairy had been stamped on a smaller die cut circle which I sponged silver shimmering paint on to, this was then layered on top of the others to the side. (I decided the coloured background would be too busy and distract from her, even though it was pretty and a bit of a shame to cover it.)  The stars from her wand were stamped across the circles and then embossed with silver glitter powder. The flowers and foliage were arranged and once I was happy it was balanced they were glued in place and gems added. Stickles 'Enchanted' was added to her wings to create a blue sparkle. It was finished with a varnish over the top to protect it. 


Lots more ideas for these stamps and fairy creations are floating around in my head, so this probably won't be the last you see of these. :)

Crafy items used:

Spellbinders Marisa's Bouquet dies
Tonic scalloped circle layering dies
Tonic Regal Fern die set
Docraft acrylic paints
Docrafts Varnish
Wow Silver glitter embossing powder
Wow black embossing powder
Silver pen (for details on butterflies)
Sparkly gems
Fairy silhouette stamps
Enchanted Stickles
Metallic spray inks

Adele
x